

When purchasing apparel products online, your customers want to know how the items might fit their bodies. Ghost mannequin photography lets them justify the products’ texture, shape, and fit.
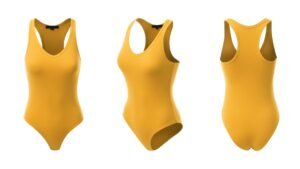
The interesting part is that this photography excludes mannequins or models and focuses on the items fully. Imagine a ghost (or an invisible human) wearing a dress, where you can’t see him, but the dress is moving slowly with the wind.
Traditional mannequin photography also showcases clothing accessories in use, worn by a mannequin. But the mannequin might grab your audience’s attention here, making it challenging to highlight the product at its best.
Study shows that the market of the fashion product will rise to 1 trillion USD by 2025, where the ghost mannequin images will be the major influencer in making purchases.
However, when the mannequin is invisible, people can imagine themselves wearing the product. The invisibility piques curiosity, evokes emotions, and ultimately engages viewers strongly.
This article covers what it is and provides a complete guide to ghost mannequin photography.
What Is Ghost Mannequin Photography?
Ghost mannequin photography showcases your apparel products in a natural drape and fit, creating an illusion that an invisible model or mannequin is wearing the item.
In other words, it showcases your clothing products as if an invisible person were wearing them. It allows you to grab your audience’s attention fully on the products you present.
The technique is simple. Shooting your apparel with a model or mannequin wearing it, and then removing the mannequin using photo editing techniques for a ghost mannequin effect.
Ghost Mannequin vs. Lifestyle Photography
Both the ghost mannequin and lifestyle photography aim to showcase your products naturally. But they have some key differences.
| Ghost mannequin photography | Lifestyle photography | |
| Procedure | Garment products are captured on a mannequin or model, and then the mannequin is used in the editing stage. | Products are shown in use with a model in a specific setting or environment. |
| Focus | It focuses on the garments’ textures, shape, and natural fit in detail. | It focuses on the association of the model with the product, creating emotional connections. |
| Pros | It lets you minimize distractions and focus on the items fully, within a small budget. | It shows clothing in action while adding brand personality. |
| Cons | Invisible mannequin photography might evoke impersonal feelings. | Lifestyle photography lacks focus on the garment products and costs more money when choosing models, styles, and locations. |
| Best for | A ghost mannequin is best for apparel products. | The lifestyle suits best when campaigning trendy products and building brand identity. |
5 Types of Ghost Mannequin Photography
Different angles or perspectives evoke different feelings and moods in the case of ghost mannequin photography. Based on perspectives, this can be classified into five categories.
Front view
The front view captures the entire front of the apparel products.
This style is widely used when running ads and other campaigns.
Back view
In traditional photography, it becomes challenging to present the back view of your garment items. Back-view ghost mannequin technique makes it possible.
Dresses become more appealing in this style.
Top view
Top-view ghost mannequin allows your audience to see the dress’s ins and outs directly from above.
It works like magic for sweaters, T-shirts, and other tops.
Side view
The side-view style showcases the garments from the side, highlighting their shape, fit, and flowy form.
To get the best result of this style, ensure that the mannequins (or model) are aligned at their best.
Three-quarter view
This style aims to capture the clothing items from an angle between a side view and a straight-on front view. In other words, it shoots both front and side views and allows your audience to see your product’s shape and fit more comfortably.
When the front view captures the clear look and the side view presents the shape, the three-quarter view combines the strength of both.
How to Do Ghost Mannequin Photography?
People are very fond of apparel items in a human form in the product image, where the human is absent. In 2026, it is one of the most effective ways to attract and engage the audience, resulting in driving more sales and generating more profit.
Ghost mannequin photography requires two major phases –
- Photo shooting
- Ghost mannequin photo editing
4 Steps to Prepare & Capture Your Apparel

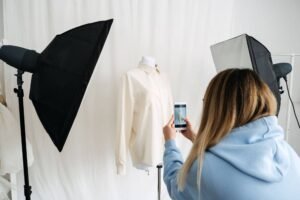
In the first phase, prepare the mannequin and the photography setup, and then capture the image with a ghost apparel photographer.
You will need two types of images to shoot. One is the apparel photo on a mannequin (or a model), and the other is the same item’s image on a hanger from the same angle that showcases the interior.
You can complete this phase within four steps.
Choose the Best Mannequin to Match Your Product
First, you must choose a mannequin that closely aligns with the size and fit of your targeted audience and the apparel you want to present. The more accurate your chosen mannequin is, the less hassle you will face in the editing stage.
A perfectly aligned mannequin lets you present the best texture and shape of your clothing items.
Prepare Your Invisible Ghost Mannequin Photography Setup
After getting the mannequin ready, you need to prepare your DIY product photography setup. When setting up, ensure the following four things:
- Background: The background must be distraction-free. A white background is best for most of the products, as it avoids any color casts that can manipulate the true hue of your apparel items.
- Lighting: Natural lighting or sunlight is best to capture the true color of your products. You can place your photography setup near a south-facing window to get the best natural light. But, when the sunlight is unavailable due to a cloudy sky or at night, use at least two artificial lights. One is the primary light, and the other is to reduce the sharpness of the shadow. However, you can learn more about product photography lighting from this blog.
- Reflector: You can use a white foam board as a camera reflector. It helps you reduce the sharpness of your product shadow. Conversely, a pure-black foam board increases the shadow’s sharpness, adding extra depth to your product.
- Tripod: A tripod is necessary to avoid unwanted shaking when pressing the capture button on your camera. A smooth and steady image grabs the audience’s attention more quickly, which requires no shaking.
Place Your Product
Now dress the mannequin. Pin the apparel into the mannequin smoothly, ensuring the natural fit of your items. Pay extra attention to areas like collars, pockets, and sleeves for the most realistic presentation.
Ensure that your clothing items are not forcefully fitted with the mannequin, as it might seem unnatural to your audience. Remember, they want to see the realistic look of the products before purchasing.
You also have to place the same apparel on a hanger to capture the interior, as mentioned earlier, after capturing photos with the mannequin.
Capture
When everything is ready, shoot! While pressing the capture button, ensure the following things:
- Steadiness: The camera must be steady when pressing the button. A tripod can help you reduce shaking. To ensure no shaking, place the camera on the tripod, and use the timer in your camera settings to capture your desired photos.
- Multiple angles: Shoot your apparel photos from multiple angles. It will give your audience a clear picture of your products. As mentioned above, apparel photography can be categorized into five based on the perspective or angles when shooting.
- Interior shots: Interior shots help you highlight the interior of the garments after removing the mannequin in the editing phase. In ghost mannequin apparel photography, capture the apparel on a hanger from the same angle. You will need the interior images in the editing phase.
5 Steps to Ghost Mannequin Photo Editing in Photoshop
The first phase delivered you the image raw file. Now, it’s time to edit the image with Photoshop, removing the mannequin, refining, masking, and combining.
You can complete your ghost mannequin photo editing in five steps.
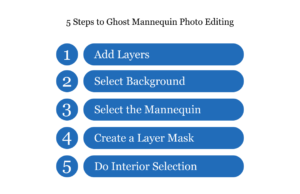
Add Layers
First, open the captured image in Photoshop and double-click on the background layer to edit the layer. You can rename the layer “front,” as shown in the screenshot below.
Then, create a new layer and place it under the front layer. Name the second layer “background.”
Next, select the background layer and fill it with pure black. If you are using the Windows operating system, press Shift + F5. On Mac, press Fn + Shift + F5.
But, if your product is pure black, fill the background layer with pure white instead.
When you choose a black background for a ghost mannequin photo editing, you will be confident that your product will look good in front of any color in the later stage.
Select Background Using the Magic Wand Tool
Now, select the front layer.
After that, select the magic wand tool from the toolbar of your Photoshop on the left. Many times, it is hidden under the quick selection tool or object selection tool. In this case, follow the screenshot below.
This time, you will see two buttons at the top of the options bar. One is “Select subject,” and the other is “Select and mask.”
Click on the “Select and mask” button.
You might get an error like nothing can be selected. In this case, a preview window will appear to you. You will see the view modes under the properties on the right side. Ensure that the view is “On layers (Y).”
Then, click on the “Select Subject” button in the option bar.
Photoshop will now attempt to figure out the object of your image.
The selection will be perfect if your captured image has a solid white background. But when a color cast happens, you can refine it manually, using the “Refine edge brush tools” on the left.
Select the Mannequin Using the Magic Wand Tool
This step is to remove the mannequin or model from the apparel product. Select the quick selection tool on the upper left side of the window. Then, click on the subtract (minus sign) from the option bar, like the one shown below.
Now, select the areas of the model or mannequin that have to disappear.
If you accidentally remove any part of your apparel product, simply press Ctrl + Z on the Windows operating system and Command + Z on a Mac to undo.
Use the eraser tool to remove any unwanted pixels for further refining.
You will see the “Global refinements” section under the properties on the left of the screen. Move the shift edge bar slightly to the right until it reaches -30%. Then, click “Okay.”
It will help you remove any halo effects due to Photoshop’s selection process.
Create a Layer Mask
Now, it’s time to mask out the subject’s background.
Open the layers panel. Select the front layer, click on the “Mask icon” at the bottom of the panel, and select the mask icon next to the front layer icon.
Now, choose the eraser tool from the toolbar on the left. Ensure that the foreground color is set to white and the background color is set to black.
Erase any area of the mannequin that is still visible. If the model or mannequin blocks any area of the garment, use the clone stamp tool to paint back the apparel color.
Do Interior Selection
Now, it’s time to open the second apparel image you shot on the hanger, which shows a part of the interior of the item, such as the neck.
Repeat the second and third steps to remove the hanger from the product and refine it.
Then, click on the rectangular marquee tool on the upper-left side of the screen, and select the neck area of the garment. After that, copy the area by pressing Ctrl + C on Windows, or Shift + Command + C on the Mac.
Now, go to your front image, select the background layer in the layer panel, and press Ctrl + V on Windows, or Command + V on the Mac to paste the copied area. You can name the new layer “Neck.”
After that, press Ctrl + T on Windows, or Command + T on Mac to scale the interior that will line up with the front of the neck.
If any other part of your garment’s interior needs to be showcased, repeat this process for that particular area.
Clean Up and Darken Interior Section
This step will turn your ghost mannequin photo from good into great. Your second photo with the garment’s interior portion is still flat. But you want it to seem filled out just as the front of your clothing item.
Select the “Interior” part (neck, for example) in the layers panel, and navigate to Edit > Transform > Warp, as shown below.
Now, pull up the neck’s center with the warp to form a curve to match the natural fit of your garment’s front side. You can adjust any discrepancies using this tool.
You can also use the eraser tool to softly remove areas that don’t line up completely with the edge.
One more thing. Create the illusion that the apparel photo was taken on an invisible mannequin. For that, you must add drop shadows to the interior portion.
Select the “Burn tool” from the left toolbar when the Interior part is selected. You might find it under the Dodge tool or the Sponge tool, just like the one shown below.
You will find several options in the option bar at the top, such as range, exposure, etc. In the Range dropdown, you will see Midtones, Highlights, and Shadows options. Use your judgment here and testify which suits best with your garment’s color.
After that, paint with the burn tool over the area of your interior, where you want to darken a bit.
Repeat the process for other interior areas of your garment.
Get the Preferred Ghost Mannequin Photo Background
You are almost done with your ghost mannequin photo editing.
Finally, go back to the layer panel, select the background, and change its color from black to white.
You can choose any other color that matches your apparel’s color. But, white is best to focus most of the product more clearly.
Hire Professionals for the Best Quality
Ghost mannequin photography is one of the most popular forms of apparel product photography that engages customers, providing detailed information about the item. It might seem challenging, but its effectiveness is beyond question in 2026.
If you have tons of images to edit in a limited time, get the ghost mannequin service from experts.
Conclusion
Ghost mannequin photos help clothes look clean and real. They show the true shape of each item without a model.
This makes it easier for shoppers to see how the clothes might fit them. Good lighting, the right angles, and neat editing can make your product photos stand out.
You can do this on your own or hire someone to help. When your photos look sharp and tidy, your store looks more trustworthy. Better photos can bring in more customers and help you sell more.
FAQ
What is a ghost mannequin?
It is a mannequin you use for photos. Later, you remove it in editing. This makes the clothes look like they float.
Do I need a special camera for ghost mannequin photography?
No. A normal camera works. You just need clear photos.
What clothes work best for invisible ghost mannequin photography?
Most clothes work well. Shirts, jackets, pants, dresses, and hoodies all look good.
Can ghost mannequin photos help me sell more?
Yes. Clean photos build trust. Good photos can bring more buyers.