This article will guide you on how to remove all of one color in Photoshop. If you often work with colors, this method can save you a significant amount of time compared to pain-selecting the subject.
While this technique works exceptionally well for solid-colored backgrounds, it’s versatile enough to handle images with less uniform backgrounds as well. There are several tools for removing all of one color in Photoshop.
How to Remove All of One Color in Photoshop – 2 Simple Methods to Follow
Removing a single color from an image in Photoshop can make your designs cleaner, backgrounds more versatile, and subjects stand out. If you want to erase a solid background, make a color transparent, or just isolate parts of your image, Photoshop gives you tools to do it easily.
In this post, we’ll explore two simple yet powerful methods: one that removes a color directly from the image, and another that uses the Select Color Range tool for more precise control. By the end, you’ll know exactly how to get rid of any color in your photos quickly and efficiently.
Method 1: Remove All of One Color in Photoshop from an Image

Step 1: Select the Magic Wand Tool
First, open the image in Photoshop, then locate the “Magic Wand Tool” in the toolbar (it looks like a wand icon).
The Magic Wand Tool is placed under the Quick Selection Tool if you cannot locate it.
To reveal the Magic Wand Tool, click and hold on to the Quick Selection Icon for a few seconds.
However, you can also access the Magic Wand Tool by pressing the letter W.

When you first use the Magic Wand Tool, it may work with magic.
However, depending on which color you select, it will generate various colors comparable to that color.
The Magic Wand Tool is particularly effective in selecting huge chunks of similar colors to create a new selection.
Depending on the situation, there may be no better tool than a color removal tool.
Step 2: Modifying Tool Settings
It’s important to remember that the color you choose will determine which option is selected.
If there are numerous color changes, it may be helpful to increase the tolerance.
You may find the tolerance section in your top settings bar, and you can enter any number you want.
If you need more clarification, stick with a tolerance range of 10 to 30 points for the time being.
- Adjust Tolerance: A higher tolerance value selects a broader range of colors, and a lower value selects a narrower scope.
- Anti-aliasing: Enabling anti-aliasing smooths the edges of your selection, making it look more natural.
- Contiguous Option: Check or uncheck the “Contiguous” option when you want the tool to select only adjacent pixels with similar colors (checked) or all pixels in the image with similar colors (unchecked).
- Selecting: Select all adjacent pixels with similar colors based on the tolerance and contiguous settings.
- Adjust as Needed: If your initial selection is imperfect, you can continue to adjust the tolerance and refine the piece until you have precisely what you want.
It is an excellent starting point, and some subtle color differences will be inside it. To generate a new selection after setting the tolerance, click on the image’s background.
Step 3: Making and Adjusting Your Selection

Occasionally, the Magic Wand Tool will miss a few targets. It is normal. Rather than starting from scratch, you can add to your current selection.
Hold down the Shift key to include additional colors in your selection while clicking on the colors you’d like to have.
To remove all colors from the selection, you can repeat this process as many times as needed.
You may accidentally choose anything that you do not want to delete while doing this.
Alternatively, hold Option (on Mac) or Alt (on PC) and then click on the color you intend to eliminate.

Adjusting Your Selection
- Make sure that the magic wand tool is selected.
- Adjusting the tolerance setting determines how similar in color the pixels need to be for the tool to select them.
- Set a tolerance level to remove a specific color that captures the range of colors you want to remove.
- A lower tolerance will be more precise, while a higher tolerance will be more inclusive. Click on a part of the image that contains the color you want to remove. The Magic Wand tool will select all adjacent pixels with similar colors based on your tolerance.
Step 4: How to Delete One Color in Photoshop

Press the Delete key while your selection is active to delete everything inside of it. You’ve now managed to remove color from the image, but you won’t be able to modify it afterward.
If you need control, follow the next step.
Step 5: Remove Color from Image Via Layer Mask (Optional)
To do this, first, you need to invert your selection. Invert your selection by pressing Shift + Command + I (Mac) or Shift + Control + I (PC).

Now select the image layer and apply a layer mask to it. You can use one of the following methods to apply a layer mask.
This method has the advantage of allowing you to adjust edges if anything goes wrong with the selection.
But, of course, it’s always good to be able to make adjustments!
Approach 1: Use the Layers Panel
With the layer selected, look for the “Add Layer Mask” button at the bottom of the Layers panel. It looks like a rectangle with a circle inside.
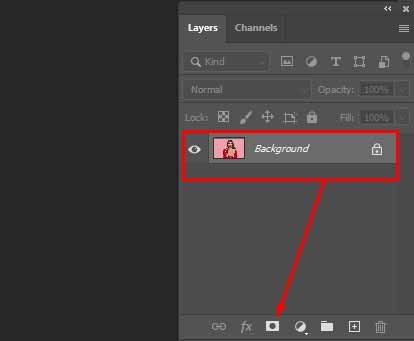
Click on it, and a white layer mask thumbnail will appear next to the layer thumbnail.

This method has the advantage of allowing you to adjust edges if anything goes wrong with the selection. But, of course, it’s always good to be able to make adjustments!
Approach 2: Use the Layer Menu
- Select the layer.
- Go to the “Layer” menu at the top of your screen.
- Choose “Layer Mask.”
- Select “Reveal All” to create a white layer mask or “Hide All” to create a black layer mask.
It will automatically add the layer mask and make your chosen color invisible.
You’ve now successfully learned how to use Photoshop’s Magic Wand Tool to eliminate one color in Photoshop.
This is the quick method. However, this doesn’t work with images with complex backgrounds.
In those cases, Photoshop experts should learn to use clipping paths.
Video Tutorial on How to Remove All of One Color in Photoshop
Method 2: Remove All of One Color in Photoshop with the Select Color Range Tool
The Color Range Tool allows for precise color selection, enabling you to target a specific range of colors, including variations in shades and tones.
This precision is crucial when dealing with color-rich images.
You can add and subtract colors from your selection easily, giving you greater control over the areas you want to affect.
This allows you to remove the image background with a gradient color and color range.
Step 1: Understand the Select Color Range Tool

In contrast to the Magic Wand Tool, Select Color Range uses the eyedropper tool to sample colors from your shot. These samples make an initial grayscale selection that is then converted into a selection of the same color.
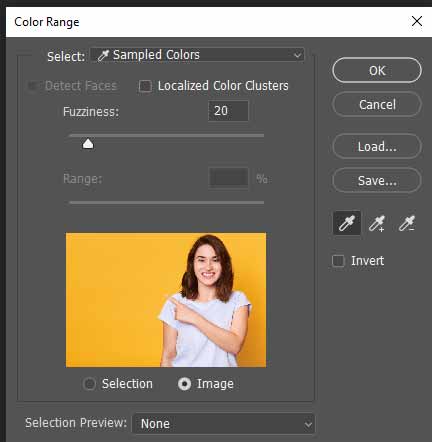
That may appear to be exceedingly complicated, but it is not.
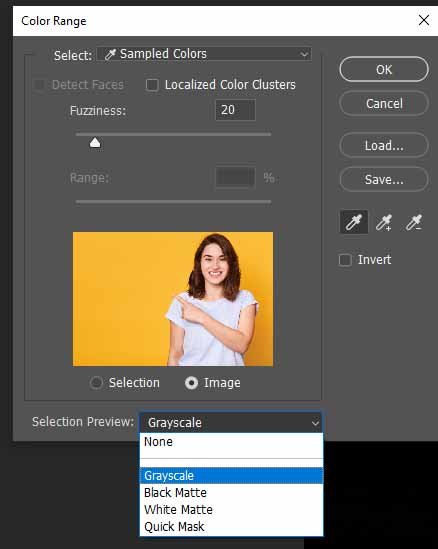
You can get to the Select Color Range Tool by selecting> Color Range in the menu bar. The select color dialogue box will open, and you will have a few alternatives to choose from in this window.
The view settings are the ones you should pay the most attention to first.
Step 2: Adjust the View Settings of the Select Color Range Photoshop Tool
You should set your image preview to ‘selection’ and your selection preview to ‘grayscale’ to achieve optimal results.
At first glance, this appears to be a complicated process, but it is pretty simple when viewed through the lens of a layer mask.
Everything you see in white is 100 percent visible, also known as being selected.
Conversely, anything completely black is entirely transparent, which means not selected.
Transparency is represented by the various shades of grey between one another. For example, a 50 percent grey region leaves a 50 percent visible area.
In addition, Photoshop’s color removal tool allows you to remove a single color altogether by making the selected color as nearly 100 percent white and black as possible.
Step 3: Creating A Selection
Click on the image area that contains the color you want to select. 2. This sets a base color for your selection.

Use the “Fuzziness” slider in the Select Color Range dialog box to control the range of colors that will be selected.
A higher value includes a broader range of similar colors, while a lower value narrows it.
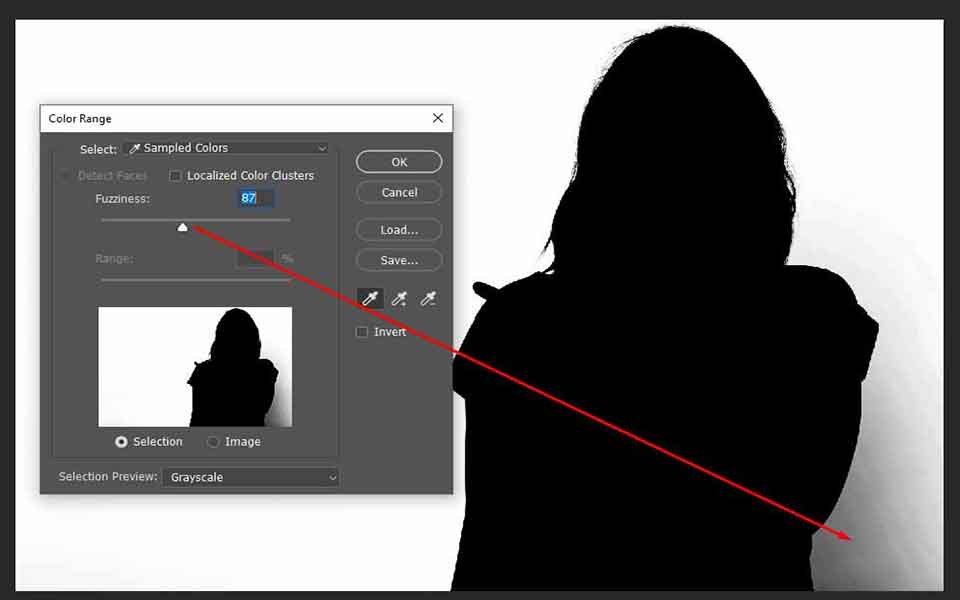
You can enable the “Preview” option to see a preview of your selection as you make adjustments.
The fuzziness slider adjusts the tolerance of the selected area by changing the value of the slider.
Thus, the greater the degree of fuzziness, the more liberal Photoshop will be in selecting colors and vice versa.
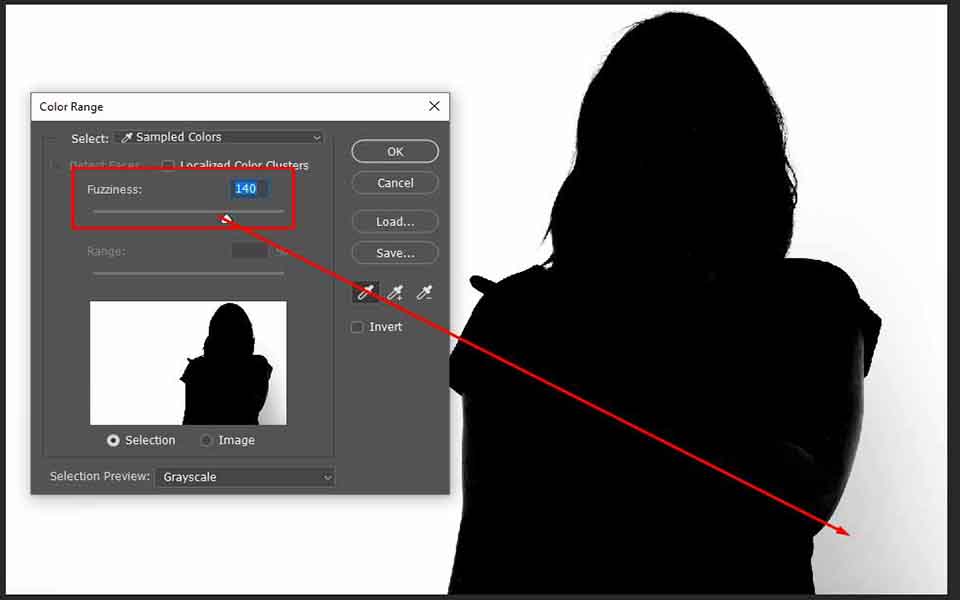
Hold down the Shift key and click on additional areas to add more colors to your selection.
To subtract from your selection, hold down the Alt key (Option key on Mac) and click on the areas you want to remove.
Continue to adjust the Fuzziness slider and click on different areas of the image until you have the desired selection.
Once your selection is satisfactory, you can output it to a new layer, a mask, or other options, depending on your software.
This allows you to edit or manipulate the selected portion separately from the rest of the image.
Note: The fuzziness will vary from picture to picture; there is no “ideal” way to do this. So instead, see what happens by sliding the slider up and down in different directions.
Once you’re satisfied, click OK to convert it to a selection.
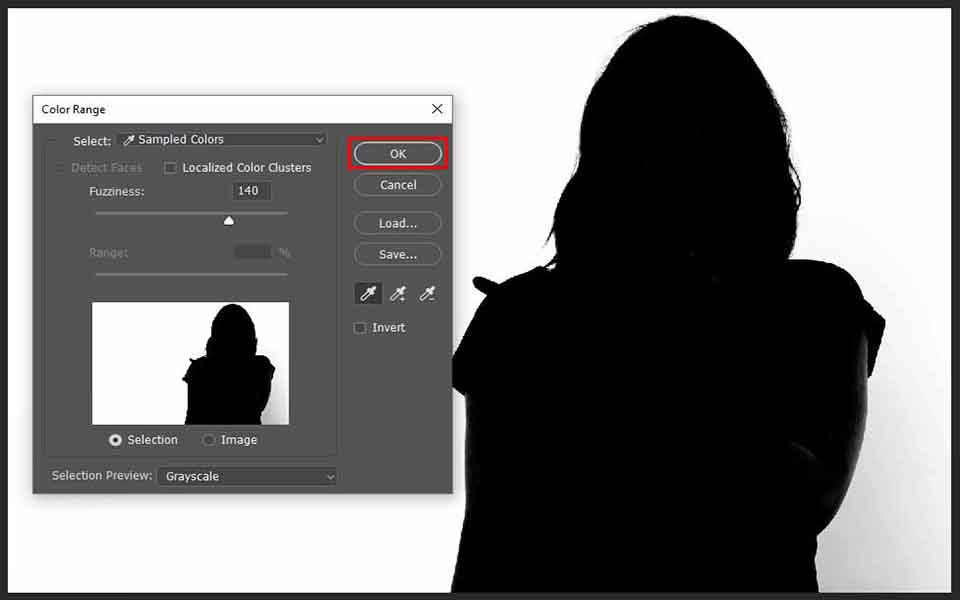
Remember to deselect your selection to work on the entire image again after you’ve worked on your selection.
This is typically done by going to the “Select” menu and choosing “Deselect” or by pressing Ctrl+D (Cmd+D on Mac).
Finally, save your image with the selection or mask to preserve it for later use.
Step 4: How to Get Rid of One Specific Color in Photoshop

The decision to erase your current selection’s contents or create a layer mask is presented to you once again with your current selection.
How to delete one color in Photoshop?
Press the delete key to remove the contents of your section permanently. It will delete a specific color in Photoshop from your picture, and it cannot be modified afterward with a different color.
That’s how to get rid of one specific color in Photoshop for you.
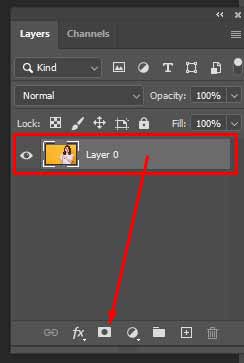
To begin the process of creating a layer mask, you must first invert your selection.
You may accomplish this by pressing Command + I (Mac) or Shift + Control + I (PC) to switch the selected region in your file.

It is recommended that you set your image preview to ‘selection’ and your selection preview to ‘grayscale’ to achieve optimal results.
At first glance, this appears to be a complicated process, but it is quite simple when viewed through the lens of a layer mask.
Everything that you see in white is 100 percent visible, which is also known as being selected.
Conversely, anything that is completely black is completely transparent, which means not selected.
Transparency is represented by the various shades of grey that exist between one another. For example, it means that a 50 percent grey region leaves a 50 percent visible area.
In addition, Photoshop’s color removal tool allows you to completely remove a single color by making the selected color as nearly 100 percent white and black as feasible.
With that, you’ve learned to remove the full colors from a photograph in Photoshop with the help of two excellent tools.
The Magic Wand Tool was specifically designed for selecting a single color in large quantities.
If you’re looking for a straightforward approach to eliminating color from a photograph in Photoshop, this is it.
The Select Color Range Tool has a great deal of functionality as well. Instead of fiddling with tool settings, you may click about to make a selection instead.
Conclusion
Removing a single color from an image in Photoshop doesn’t have to be complicated when you understand the right tools and settings. By using options like the Magic Wand and Color Range, you can quickly target specific hues while maintaining control over edges and details.
These techniques make it easier to clean up backgrounds, enhance product photos, or create more visually focused designs. After a bit of practice and fine-tuning, you can achieve professional-looking results while keeping your workflow efficient and flexible.
With just a few mouse clicks, you can create a precise selection that removes a specific color range. To ensure your images look perfect after editing, our Image Color Correction experts can help refine tones, brightness, and overall image quality.
FAQs
Which tool should I use – Magic Wand or Select Color Range?
It really depends on your image. The Magic Wand Tool is great for quick edits, especially when your background is a solid, consistent color. For images with gradients, mixed colors, or subtle shading, the Select Color Range Tool is your best friend because it gives more precise control over what you select.
Why aren’t all areas of the color being selected?
This usually happens when your Tolerance (Magic Wand) or Fuzziness (Color Range) setting is too low. Increasing it slightly will capture more shades of your chosen color. You can also hold Shift and click on the missed spots to add them to your selection manually.
I accidentally selected part of my subject. How do I fix it?
No worries! Hold Alt (or Option on Mac) and click on the areas you want to remove from the selection. Another option is to use Select and Mask after your initial selection to refine edges and exclude unwanted parts.
Should I delete the color or use a layer mask?
Using a layer mask is always safer. Deleting pixels permanently alters your image. Masks hide the color non-destructively, so you can adjust or even undo your changes later. Simply paint on the mask with black to hide or white to reveal areas.
How do I remove a gradient or uneven background color?
The Select Color Range Tool handles this scenario best. Sample multiple shades from the gradient using the eyedropper, and tweak the Fuzziness slider until the background turns white and your subject remains black in the grayscale preview. This ensures a clean, precise selection.
What does “Contiguous” mean in the Magic Wand settings?
When Contiguous is checked, the tool only selects pixels that are touching your starting point. Unchecking it lets Photoshop select all similar-colored pixels across the entire image, even if they’re not connected.
My subject’s edges look rough or have a color fringe. How do I fix this?
After creating a layer mask, right-click it and choose Select and Mask. Use tools like the Refine Edge Brush and adjust sliders like Smooth, Feather, and Contrast to create softer, more natural-looking edges.
What if my image has multiple colors I want to remove?
No problem! You can repeat the process for each color individually. Alternatively, with Select Color Range, hold Shift while sampling multiple colors in one go to include them all in a single selection.


