
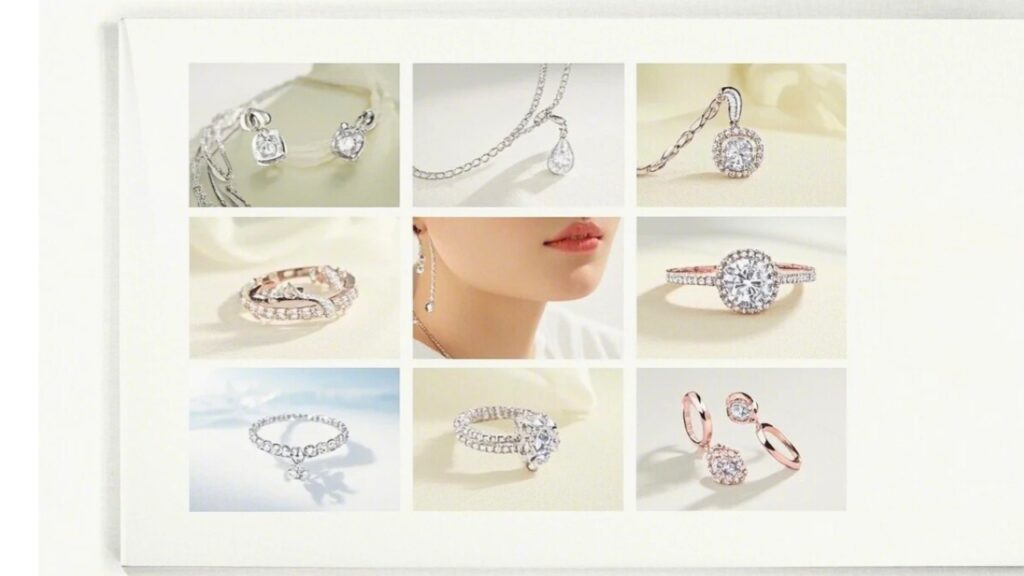
Have you ever seen a jewelry image that looks artificial or fake? One that has diamonds that look like they are glowing in the dark and gold that looks as smooth as glass?
Sparkle does sell, but too much can have your customers wondering if it’s the real thing. Too little and you may have a lovely piece of jewelry, but the sparkle that draws us to jewelry goes missing in the shadows.
This is the dilemma of jewelry retouching. Finding the right balance between sparkle and realism is our starting point. Whether you’re editing an eCommerce product image or a close-up for a catalog, you do not want to create a product that breaches customer trust when over-edited, or if not edited enough, misses the sale.
In this tutorial, we will cover jewelry photography retouching, where we balance realism with the sparkle of jewelry.
You’ll learn how to edit diamond jewelry in Photoshop as well as maintain the texture and color, so your photos are polished, without making your product overly polished. Let’s get started.
Why Jewelry Product Photo Retouching Is Essential for Online Sales
Jewelry retouching is a method of preparing and polishing jewelry photos. Even professional jewelry photography can meet problems such as dust, fingerprints, and black light. Retouching will help clean those issues up.
But there is a line between enhancing the image and over-editing. When you enhance an image, you clean up flaws or fix the light or color to make it real.
If you add too much editing on top of your imported photograph, you may enhance the ring or diamond sparkle too much, or you may enhance the color of gold to a brighter color than it is in real life. That is not honest retouching work!
When shopping online, customers can only see a product’s picture before buying. If the piece of jewelry looks beautiful in the image, but it is not the same in person, trust has been broken. This can lead to returns and negative reviews.
Great retouching makes your images clear, sharp, and real. But this all works best when it’s in your favour to photograph the jewelry clearly to begin with.
If you achieve the best light during the photograph session, have a perfect background, and use the correct camera settings, it will limit your need for heavy edits.
In summary, photograph a great image, then retouch it just to show the piece of jewelry as it is in real life.
Setting Up for Success: The Role of Jewelry Product Photography
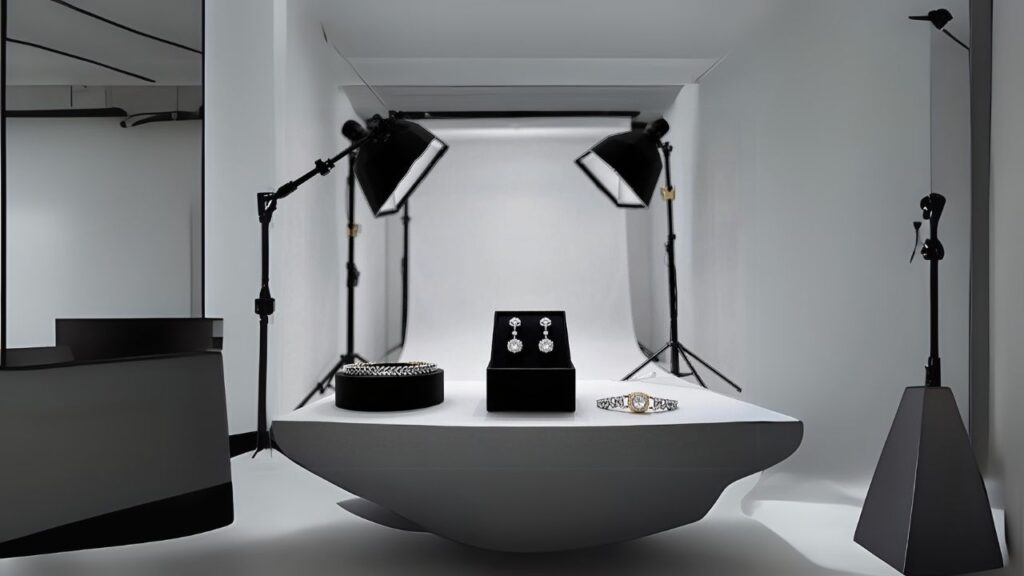
Great jewelry photography = less editing. A clean, sharp shot saves you time in your post-work. Using a tripod also helps you keep the image steady. Set your ISO low and aperture high to capture details.
Lighting is the most important, and put your soft lights at a 45-degree angle to capture sparkles without producing unwanted glare. If you want to know how to make jewelry sparkle in photos, get some little spotlights or LED pen-lights to target your gemstones directly.
Use black cards to provide shape and contrast to the metal. Use diffusers to soften reflections on shiny surfaces. Use reflectors to bring light back into the image where it’s needed (for example, under rings or between prongs).
Avoid mixed lighting. Use daylight bulbs only. Keep the background simple. Remove anything unnecessary from the background.
The better you shoot, the less you will have to retouch. This is quicker, cleaner, and the jewelry looks real.
The Sparkle Dilemma: Why Less is More
A common mistake in editing is adding too much sparkle. It makes the jewelry look fake. Most people think that more shine means better. But in reality, it ruins the photo.
If you’re wondering how to make jewelry sparkle, start during the shoot. Use focused lights to catch real reflections. That’s called natural sparkle. It looks clean and believable.
Adding fake glows or glitter in editing rarely works. It often hides details and makes stones look flat. This kind of sparkle jewelry doesn’t sell trust; it creates doubt.
Try subtle enhancement instead. Use the dodge tool to brighten areas where light naturally hits. Add a light sparkle effect only on the gemstone’s edge or facets.
Let the piece shine, not the effects. Less sparkle often feels more real. And real is what makes people click “buy.”
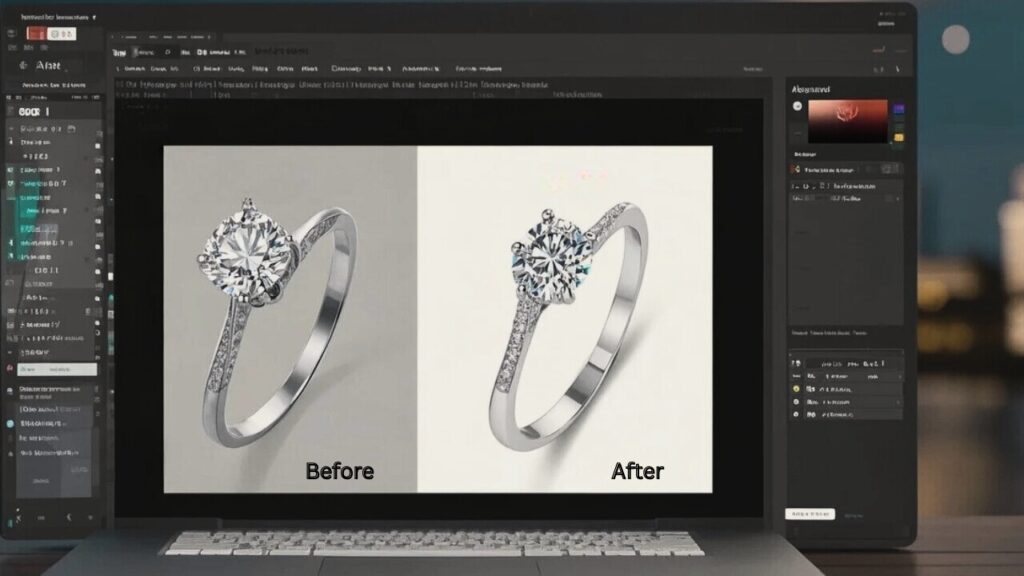
A Step-by-Step Guide to Realistic Jewelry Retouching in Photoshop
Smart jewelry retouching requires a perfect balance between looking good and looking real. We’ve put together this step-by-step tutorial to assist you in editing your jewelry images.
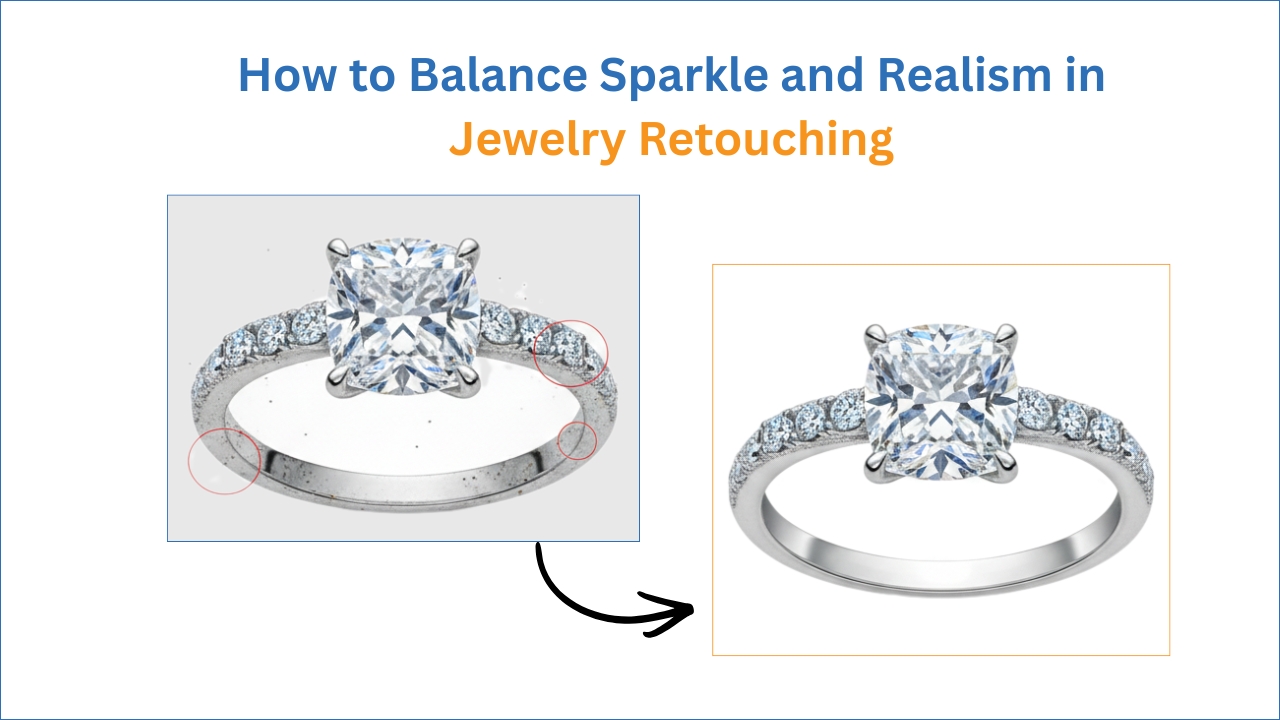
Step 1: Clean-Up Work Jewelry
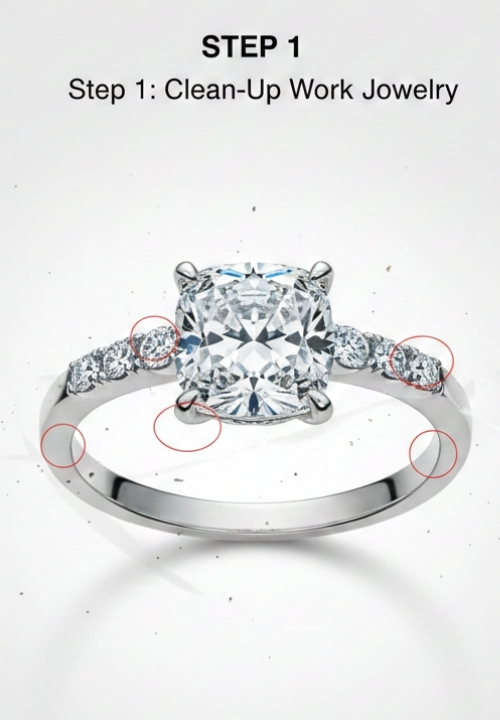
Start by carefully looking at the image. Remove spots, blurriness, or fingers in the photo. If there is, you can use the Spot Healing Brush to correct tiny marks.
If there are larger marks or scratches, you may need to use the Clone Stamp Tool and paint over them. Zoom in for perfect results. Make sure the background is clean and looks good with the image.
Step 2: Jewelry Color Correction
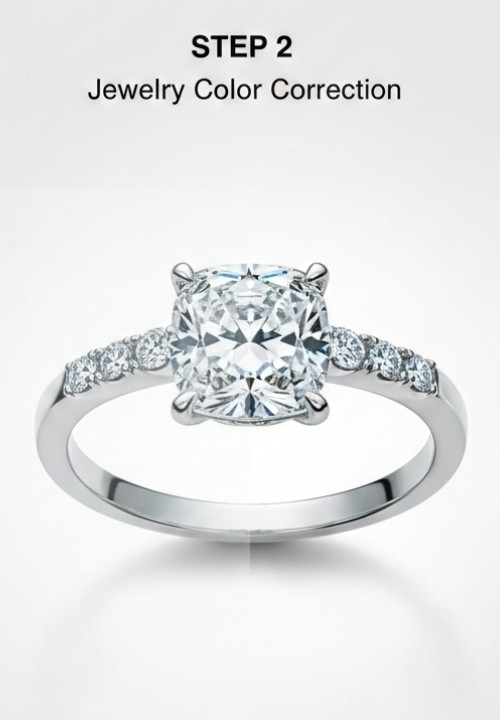
You’ll want to start by correcting the white balance stage. All metals (silver, gold, platinum) should read naturally and not be too cool or too warm.
You may also want to adjust exposure to give the piece a little brightness, but don’t blow out the highlight detail.
Adding a little bit of contrast is very helpful for giving life to the gemstones. Soft and clean gradients work well too, as it keeps the image believable and real.
Step 3: Enhancing Jewelry Sparkle Without Going over the Top
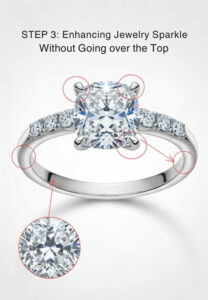
This is where most people go too far. The Dodge and Burn tools will allow you to brighten gemstone facets where the light naturally hits them.
This is a great way to showcase sparkle in a soft, believable way. You can also add some sparkle overlays, but only in very small amounts.
Please focus only on the very brightest areas added. Going over the top makes the piece look unrealistic.
For polished metals, apply a slight gloss to the surface’s curved areas, but refrain from reflections turning into a mirror. It’s better to avoid a shiny metal finish. This looks fake. A little shine goes a long way.
Step 4: Keep the Texture
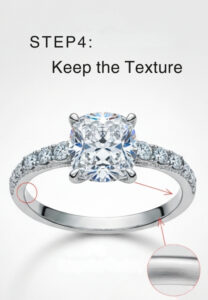
One important jewelry retouching tip is, don’t just blur everything. Texture is an important part of jewelry. The brush grain in enamel is important.
You don’t want to lose the micro cuts and edges in the gemstones. If you smooth or blur it a lot, it will look plastic.
Noise reduction is awesome, just don’t overuse it. Only use it where it makes sense.
Avoid using Liquify unless the shape of something is severely distorted. Even then, be mindful of using liquify and make small moves. Again, always check your edit when you are done.
Step 5: Realistic Shadows

Jewelry can’t hover in the air, so be sure to use a soft shadow when it’s on a ring or pendant. If you can use the existing shadows, then enhance them.
If the shadows are poor or unusable, then make a soft drop shadow on a separate layer. Just be sure that it matches the direction of light in the photo.
In conclusion, as great as jewelry photo editing should look, it should reflect invisibly. You are not changing the product; you are allowing it to shine as it does in real life.
Tips to Follow When Retouching Jewelry Product Photos
Jewelry retouching looks easy until it goes wrong. A background feels too flat, an edge looks cut out, or the shine starts to look plastic.
These are small issues, but they change how people trust a product.
Smart Background Techniques: Keeping it Clean
A clean background makes your jewelry pop and properly represents your brand. Most companies use a light grey or white background.
It may feel boring, but it is well done, with some basics to avoid. If your background is too flat, your jewelry is “hovering”. If it is too sharp, it gives the impression it has been cut out.
So, how to remove the background from jewelry in Photoshop? Remove the background from jewelry with the Photoshop Pen Tool, so you have a guideline and control.
It is like an informative walk along the edges. For really detailed pieces, use Select & Mask.
Watch out for sharp edges! They are not realistic. Feather the edge after you cut out this piece. 0.5-1 pixel works great for high-resolution images.
Another great trick is to use layer masks. Layer masks allow you to be extremely precise without damaging any of the original image.
You can always improve the mask later if it turns out to be too harsh or too loose.
Always, always include some minimum shadow or gradient! This keeps depth. Also, it anchors your jewelry piece so it doesn’t look like it’s floating.
Clean is not the same as flat. A good background should embrace the piece without taking away from it.
Consistency of Style in Product Lines
Jewelry photo editing is all about consistency. If all of your product images look right, it shows that your brand is stable, trustworthy, and credible.
If your photos don’t look like the sound quality and clarity, customers can not trust your store and think it was built without effort or care.
Consistency builds trust. When your product grid looks like a collection:
- The buyers feel confident
- Your brand looks polished
Consistency makes your product line look like a collection, not a collage.
Tools & Plugins to Balance Sparkle & Realism
For smart jewelry photo editing, the right photo editing tools are everything!
A lot of jewelry retouching tools have AI. This helps you get your result faster. But don’t rely on them completely. They can make your product photo look fake. Always double-check and adjust to ensure the final image looks real.
Conclusions
Balancing sparkle and realism in jewelry retouching is important. It highlights gamestone reflections and makes your jewelry shine.
On this blog, we covered how to Balance Sparkle and Realism in Jewelry Retouching. that include the step-by-step guide to retouching tips to create premium-looking images.
If you want to create a high-quality, top-notch jewelry image and are trying to balance sparkle and realism, follow the blog post and keep practicing.
Or if you need professional help to make your collection shine without overdoing it? Our jewelry retouching service can offer the assistance needed. Let’s put the life back in your products, naturally, beautifully, and believably.
FAQs
What is the best way to remove the background from jewelry photos?
The Photoshop Pen Tool is the most reliable method for jewelry background removal it gives precise control over edges. For complex details, Select & Mask can help refine the selection. Always soften edges slightly to avoid a sharp, unrealistic cut.
Should jewelry backgrounds always be pure white?
Not always. White and light grey backgrounds are popular because they keep the focus on the jewelry, but they still need depth. A background that’s too flat makes the jewelry look like it’s floating, while one that’s too sharp looks cut out. Soft gradients and realistic shadows help maintain balance.
Why do some jewelry photos look fake after retouching?
Too much sparkle, heavy glow effects, and overly smooth metal can make diamonds look artificial. Good retouching enhances what’s already there instead of creating effects that don’t exist in real life.
How much sparkle is too much in jewelry retouching?
If the sparkle starts hiding details or makes the stone look flat, it’s too much. Real sparkle comes from light interacting with facets, not from added glows or glitter effects. Subtle dodge work in natural highlight areas usually works better than strong effects.
Is jewelry retouching necessary if the photo is shot well?
Yes, but only lightly. A well-shot jewelry photo requires minimal retouching, such as cleaning dust, correcting color, and enhancing clarity. A good jewelry product photography reduces the need for heavy editing and keeps the final image more realistic.
Why is consistency important in jewelry product images?
Consistency builds trust. When all product images share the same lighting, background, color tone, and editing style, your store looks professional and reliable. Inconsistent images make a collection feel random, and it will reduce buyer confidence.