

Have you noticed the flawless model portraits in magazines and billboards, and how you get professional skin retouching in Photoshop perfectly done? This tutorial shows you how to do professional skin retouching in Photoshop and achieve picture-perfect results.
Professional skin retouching in Photoshop isn’t necessarily a complicated process. However, the more efficiently it is done, the better results you will get.
Working on the fine ones, hair, blemishes, and smoothing out skin tones; these little changes will make a big difference in the final image outcome. As much as photography holds importance, post-shooting or post-editing makes a difference in the picture. Would you like to make photography look extraordinary and natural in tone? Then, this tutorial is for you to learn how to do professional skin retouching in Photoshop.
What is Skin Retouching?
Skin retouching is the process of enhancing the face and body by smoothing skin, removing dust, and wrinkles.
It also include remove or correcting skin imperfections, blemishes, and other skin improvement settings.
That makes your image look appealing, natural, polished, and attractive.
Why is retouching skin important for your image?
Professional skin retouching in Photoshop helps your photography draw attention by bringing in minor changes. For example, skin retouching helps avoid distractions such as flyaway hair, wrinkles, blemishes, etc. Maintaining the natural texture in the image and making the subject look unique and important.
Study shows that 5.3 billion photos are taken daily around the world, and very few of them get the proper attention. Only highly retouched images can stand out in the crowd. So, professional skin retouching in Photoshop is very crucial.
10 Steps Guide for Professional Skin Retouching in Photoshop
In the steps below, you will learn how to give your portraits beautifully smooth and natural-looking skin with professional skin retouching in Photoshop.
Step 1
Open the Image in Photoshop and copy the image by duplicating the background layer.

Step 2
From the toolbar, select the Spot Healing Brush and set the type option to ‘Content Aware’ from the above toolbar.

Step 3
Remove the blemishes by clicking on the image, and Photoshop will instantly heal the blemishes and give a soft skin texture to the skin. You can adjust your brush size slightly bigger than the blemishes to get better results.
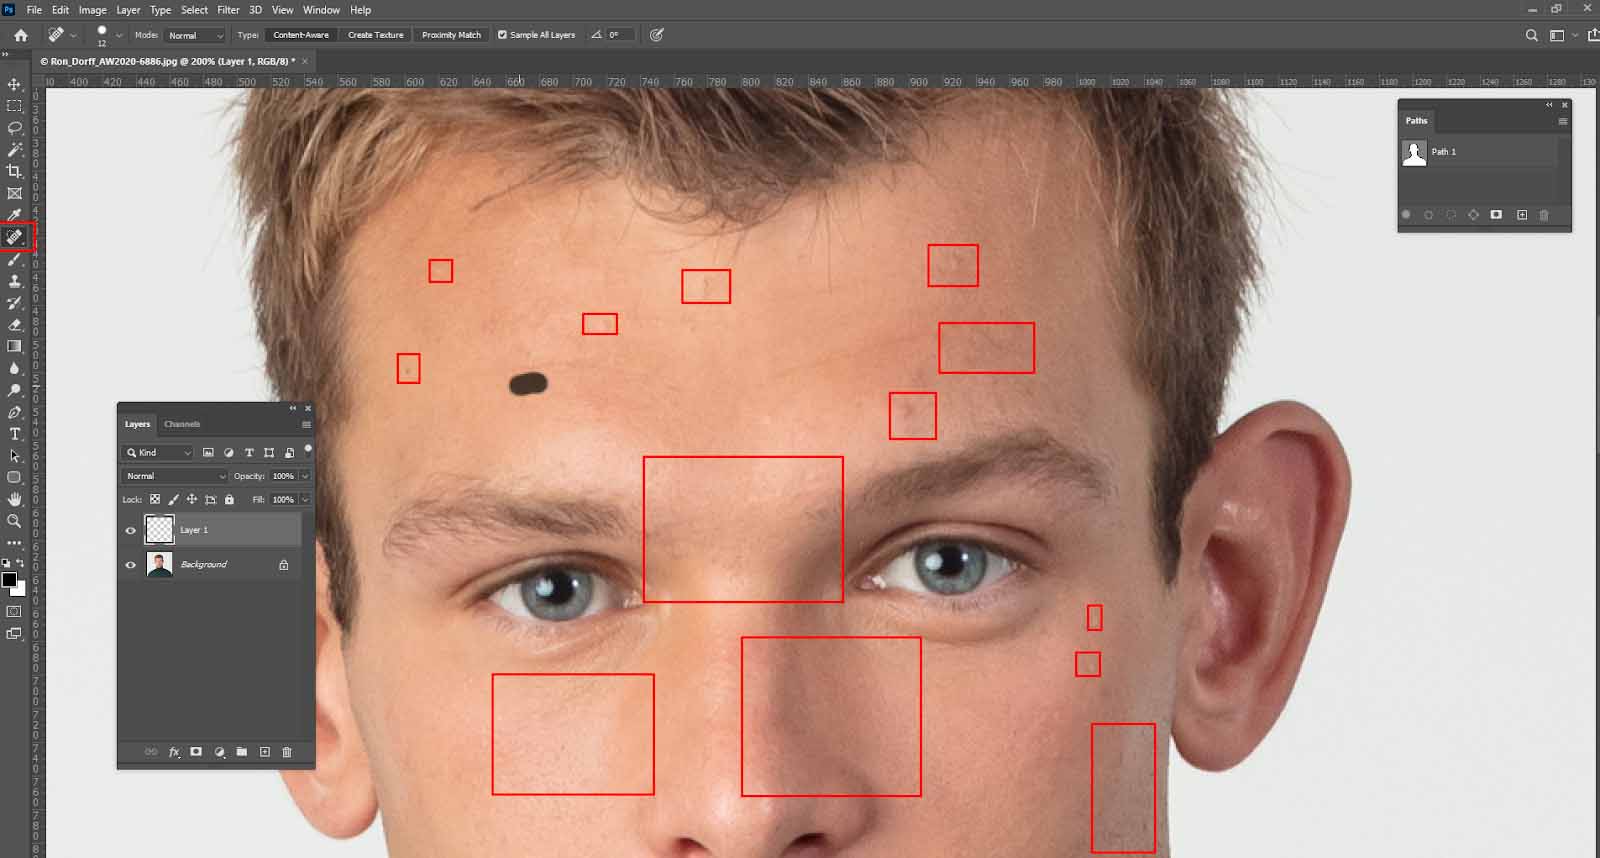
Keep in mind that while removing blemishes, keep it natural, like removing pimples, acne, or minor issues. However, it is best not to remove permanent features because that makes the picture beautiful and realistic, and represents who they are.
Step 4
Make a copy of the existing layer where you have worked with the blemishes to smooth and soften the skin.

Step 5
Apply the ‘High Pass Filter’ to smooth the skin by going to Filter> Other > High Pass and setting the high pass’s radius value to 10.


Step 6
After that, go to Filter> Blur > Gaussian Blur and set the radius value to 2.

Step 7
Change mode to Vivid Light

Step 8
Select and add a layer mask to hide the smoothing effect from view

Step 9
Select the brush tool and set the color to white. Make sure the Blend Mode is set to Normal, Opacity is set to 100%, and Flow is set to 100%, and then reveal the smoothing effect by painting over the skin. You can also go to Filter> Noise > Dust & Scratches.

Step 10
View the layer mask and check the smoothing effect if it’s good enough, or you can lower the opacity of the masked layer according to your preference.

And there you go; your retouched photograph is ready!
Bonus Tips:
- Make sure to keep the subject in the photo as natural as possible. No matter the amount of skin retouching you would consider for the picture, it shouldn’t portray unrealistic results. Keep in mind to keep the details of the image and work on a few unavoidable edits to make your photographs unique and attractive.
- The amount of skin retouching depends on where the image will be used. A photograph taken for a magazine shoot will have a different retouching level than a photograph used on a social media account.
- The methods give an idea of how to work on it. However, you must develop a style of your own to make your work stand out from others.
Professional photo retouching in Photoshop can undoubtedly be a bit complicated process for you if you are doing it for the first Though, a few edits might need several layers to come to results.
Therefore, having a basic knowledge of working with Photoshop layers might also help you learn faster. However, we are sure that the above steps are enough to get you started smoothing skin in Photoshop.
Wrap up:
Skin retouching is important for making your image more attractive by enhancing natural tones and edges.
If you want to become an expert in skin retouching, this article will help you. Follow the step-by-step guidance for skin retouching to create a perfect, natural-looking image.
To create perfect skin retouching, keep practicing, experiment with multiple settings, and apply techniques.
FAQs
What are common skin retouching mistakes?
Some of the most common skin retouching mistakes are over-smoothing, excessive texture usage, and over-editing.
What techniques are used in skin retouching?
You can use techniques such as initial adjustments, frequency separation, localized curve layers, removing destructive elements, dodging, burning, and color passes. This way, you can make a perfect image.
Which Photoshop tools are best for skin retouching?
For skin retouching, some of the best Photoshop tools are the Spot Healing Brush, Healing Brush, Clone Stamp, Patch, and Remove tools.
What is the best photo skin retouching software?
Adobe Photoshop is the leading software for photo skin retouching. You can gain full control over retouching with the Photoshop manual and automated processes. Using it, you can make your image pixel-perfect.
What to use for retouching: Lightroom or Photoshop?
You can use Adobe Lightroom to retouch your image if you want to get it done quickly and efficiently. But if you want to retouch your image pixel-perfect and with full manual control, use Photoshop.