

Tabletop photography is a specific way of product photography whereby the focus is on a small object, usually against a controlled environment.
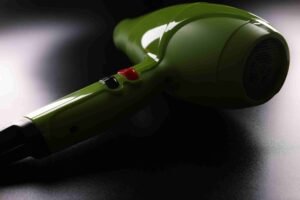
It’s an extremely versatile technique applied to a wide array of subjects, from jewelry and watches to electronic devices.
Tabletop photography requires extreme detail, along with good lighting conditions and composition.
This article aims to cover everything about tabletop photography for your perfect DIY product photography setup.
What Is Tabletop Photography?
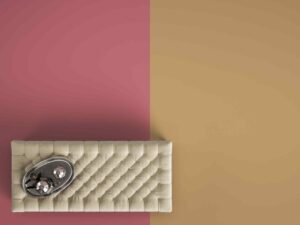
Tabletop photography is a process of photographing the product placed on a flat surface, typically a table. The idea is to isolate the product and make its different features look as good as they can be.
A tabletop photography setup gives you full control over lighting and angles. They give consistent results for many products. They work in small spaces.
You do not need expensive gear for a tabletop shoot. A simple setup can still look great.
A tabletop photo studio is usually used for photographing products. People use these photos on Amazon, eBay, and Shopify. It is also great for social media posts. Many catalogs use it too.
Brands use it for lifestyle shots that show how a product fits into daily life.
Types of Tabletop Photography
Tabletop photography can be done in different ways. Each style has a purpose. Choosing the right type makes your photos look professional and fit your needs.
Some types focus on clean, simple shots. Others show the product in a real-life setting.
Isolated Product Photography or White Background Photography
Isolated product photography, also called white background photography. This is the classic approach, where the product is taken against a clean, neutral background to detail the product.
This type of photography highlights the product clearly. The lighting is soft and balanced, and all product details are easy to see. The background stays clean and distraction-free, making the images look professional and consistent.
It also helps your images meet platform requirements, like Amazon or eBay standards. Overall, it improves sales and builds a strong brand image.
Collage Product Photography
Lifestyle tabletop photography shows products in a real setting. This style combines more than one product or any other elements in a single frame to increase attractiveness.

It’s often used to tell stories. You can use props and arrange them to tell a story. The scene should feel natural and look nice. Use this style when you want to create lifestyle product photography.
It works great for social media, ads, or branding. It helps people imagine the product in their own world.
How to Build a Tabletop Photography Studio in 9 Steps?
You don’t need to spend a huge amount of money to set up a tabletop photography studio. Rather than implementing the right types of equipment, techniques, and planning, you can create a professional studio for diy product photography at home.
Preparing A Suitable Table
Choosing the right table is important for tabletop photography. You will want a really sturdy and stable table for tabletop photography. The table should be big enough for your product and any props.
The material of the table matters too. Smooth surfaces work best for clean shots. Wood or textured surfaces can add character for lifestyle photos.
The color of the table affects how light reflects. A white or light-colored table will help in reflecting light and illuminate the pictures well. Dark colors can make shadows stronger. Choosing the right color helps your product stand out.
Choosing the Best Camera for Tabletop Photography
Any camera is suitable for tabletop photography. You can use a DSLR, a mirrorless camera, or a smartphone. Each can work well depending on your needs.
| Camera Type | Pros | Cons | Best For |
| DSLR | High image quality, versatile lenses | Bulky, expensive | Professional product photos |
| Mirrorless | Compact, high-quality | Shorter battery life | Small studios, e-commerce |
| Smartphone | Easy, portable | Limited manual control | Quick shots, social media |
However, a DSLR or mirrorless camera will definitely be best for capturing the best resolution.
Image quality, manual control, and interchangeable lenses are other features that will help you capture the best visualisation of your items.
Adjusting the Best Lens for Tabletop Photography
The right lens will go a long way in ensuring that your tabletop photographs come out great.
- For small items, a macro lens is ideal. It lets you show fine details up close. Use 90-105mm for macro shots.
- For medium-sized products, a standard lens works best. It gives a natural perspective and keeps the entire product in focus. Use a focal length of 50mm for standard shots
- Wide lenses are good for creative shots or lifestyle setups. They capture more of the scene and props around the product. Use 24-35mm for wide or creative images.
Experiment with different lengths to settle on the most suitable perspectives for your products or objects.
Picking the Tripod for Your Camera
You will, of course, need a good tripod to take sharp and steady images. Look out for a sturdy tripod that can be adjusted to various heights.
It will help you maintain consistent framing and, through this, eliminate the shake of your camera.
Preparing the Tabletop Photography Lighting
Light may be sourced naturally, but it is not consistent most of the time. So, you can invest in artificial light sources like softboxes, lightboxes, or LED lights.
Only light sources might cause harsh shadows on your items. It defocuses your objects, resulting in lower conversion rates when campaigning. To avoid harsh shadows, use light diffusers opposite the light source.
Creating A Tabletop Photography Light Box
A lightbox is an extremely versatile tool to add to your tabletop photography. It provides even, diffused light and takes away all the product photo reflection shadow.
You can purchase a pre-made lightbox or make one using white fabric, a strong frame, and light.
Choosing the Tabletop Photo Backdrop
The tabletop background for photography is going to form the backdrop for all your images and is thus very important for the overall appearance of the result.
Choose a color or texture that will contrast well with your product. White, gray, and black backdrops seem to be very popular choices for a clean, professional look.
Preparing Reflectors to Control Shadows
The reflectors fill in the shadows and give your images more light.
A white or silver reflector would lighten the shadow of your items. A black reflector would absorb the light and give you darker shadows.
You can read through this guide for the details about the product photography lighting setup.
Collect Essential Tabletop Photography Kits
Other than the core equipment, there are a couple of basic accessories that you must have in your tabletop photography setup.
These include a camera remote, a lens cleaning kit, a gray card, and some kinds of props that will help in enhancing your shots.
However, you can check out this link for various kinds of tabletop photography studio kits.
Creative Tabletop Photography Ideas
Want to really make your tabletop photos pop? Then, think out of the box.
Here are some creative tabletop photography ideas to get you started on your next shoot.
Evoke Emotions with a Colorful Background
Background color can strongly set a picture’s mood. Vibrant colors energize, while pastel colors are soft and soothing.

So, experiment with different color combinations to find the right backdrop to set your product in.
Use Texture for Moods
Add texture to your tabletop setup to create interest and dimension in your shots. Rough, weathered wood adds rustic charm. Smooth marble adds a touch of luxury.

Keep in mind that the texture must highlight the product and complement its appeal.
Use Props to Compliment Your Products
Tabletop photography can be a great way to tell stories, and props help a lot with it. Not only do they provide context to the image, but they add visual interest and make it beautiful.

So, choose props wisely that work well with your product to help you achieve the desired mood.
Use Natural Light for the Real Look
While artificial lighting is usually the go-to for tabletop photography, natural lights give a more organic feel to the shoot. Photographing your product next to a window on a cloudy day could provide very soft and diffused light. It will add great flair to your product.
Be careful with shadows, though, and use the right camera settings to counteract them.
Try Symmetrical Product Photos to Create Harmony
Symmetry is one of the strongest compositional devices to render a picture with a sense of equilibrium and harmony.
So, experiment with symmetrically placing your products to give a feel of cleanliness and a beautiful view.
Play with Dimensions on a Reflective Surface
Add a reflective surface to your desktop setup to give your photos interesting visual effects and depth. Glass, mirrors, or polished metal will cause a reflection of the product, creating engaging compositions.
Add Smoke Effects to Evoke Mystery
Smoke can add a little drama and mystery to your tabletop photography. It can be used to create ethereal effects or obscure parts of the image.

So, experiment with different smoke densities and colors to achieve the desired look.
Experiment with Floating Objects
Create cool illusions of floating objects for a fun, eye-catching way to sell your products. It can be achieved through proper placement of products on the photographing platform, an invisible thread, or simply editing it in post-production.
Try Micro Shots for the Details
Use macro photography to show the details of the product or intricate designs. A small product photography setup is a technique where one can take images at a very close distance that will reveal the fine textures and patterns of the subject.
Common Tabletop Photography Mistakes and How to Avoid Them
Small mistakes can make product photos look messy or unprofessional. Knowing what to watch for helps you take better pictures.
- Harsh lighting: Too much direct light creates strong shadows and glare. Use soft light to make the product look clear.
- Busy backgrounds: Cluttered backgrounds distract from the product. Keep it simple and clean.
- Wrong angles: Shooting from a bad angle can hide details or make the product look strange. Try different angles to find the best one.
- Dust and scratches: Dust, fingerprints, or scratches ruin the shot. Always clean the product and props before shooting.
- Over-editing: Too much editing can make the image look fake. Keep colors and edits natural.
Edit the Tabletop Photos with a Professional Touch
No matter which techniques you apply for tabletop photography, the conversion rate depends on the final touch in the post-production stages. This can help increase sales and clicks on your online store.
You can use tools like Photoshop or Lightroom for professional results. There are also simpler alternatives if you don’t have these programs.
Sometimes editing takes too much time or requires expertise. In such cases, outsourcing your editing can save time and ensure high-quality results.
There are a number of professionals out there who can turn your average tabletop images into stunning looks.
UK Clipping Path is an organization dedicated to providing product photo editing services at the lowest cost possible. The photo editing services aim to save you time, energy, and money without compromising the best quality images.
FAQ
What is the ideal lighting setup for tabletop photography?
Use soft, even light to make your product look clear. You can use sunlight or lamps with diffusers. Try 2- or 3-point lighting for best results.
Can I use a smartphone instead of a DSLR?
Yes! Modern phones take great photos. Use a tripod and macro lens for close-ups. Apps can help you control focus and light.
How do I pick the best background and props?
Choose colors and textures that make the product stand out. Keep it simple or add props for a lifestyle look. The right setup makes your photos attractive and interesting.
What is the best tabletop photography studio kit?
The perfect tabletop photography studio kit depends on your needs and budget. Below are some of the basic items that are included in a kit:
- Lightbox: To soften the harsh shadows.
- LED lights: For adjustable brightness.
- Backdrops: These are for different colors and varied materials to create a mood.
- Reflectors: To fill in shadows and add dimension.
- Small accessories: Clamps, tape, tweezers, etc., for product placement.
While most studios tend to be packed setups, there are studios that you can create on your own, down to the smallest piece. Pay important attention to investing in quality components that surely have a long life.
How to shoot tabletop photography with just a modeling light?
While the best would be to have the proper photography setup, you may still end up with satisfactory results using just the modeling light. Here are some tips:
- Diffuse it: With a white sheet or a made-at-home rig, soften that harsh light from the modeling light.
- Experiment with angles: Move the modeling light around to different effects.
- Reflecting: It will round out the shadows in your product and give it some depth.
- Manual camera settings: Once you have this in place, you will be able to control your camera’s settings for exposure and white balance.
- Adjust white balance: Make sure the color is represented correctly by setting the white balance for the type of light source that will be recorded.
But remember, even though one source of modeling light is a limitation, you can still make some good pictures if you plan it well and develop the skill in execution.