
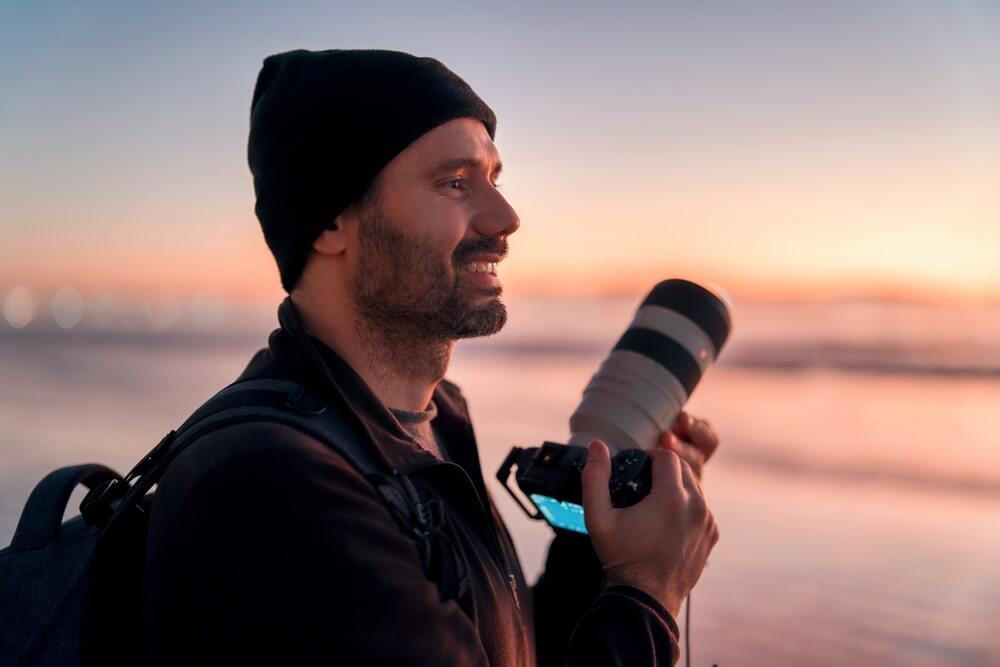
Ever wondered how professional photographers click stunning images and make simple scenes eye-catching? These questions might arise in your mind, especially when you are a beginner in photography. FYI, professional photographers utilize different and effective photography techniques to make their shots look magnificent.
Learning professional photography will help you see little things differently. Once you understand the language, you will rediscover a new world around you and embrace its beauty. This article contains 15 professional photography tips to take better photos.
You can use these tips to improve your photography. Whether you are willing to improve your portrait shoots or take professional photos, this guide aims to teach you how to assist with that. Here is a list of 15 tips that a photographer can take to shoot photos with a short description.
| Photography Tips | Benefits |
|---|---|
| 1. Hold Your Device Properly | Prevents you from capturing blurry images due to shakiness. |
| 2. Shoot in RAW | Lets you capture high-quality photos. |
| 3. Master the Rule of Thirds | Enables you to stand out from the crowd with amazing captures. |
| 4. Try Different Shooting Angles | Make photos more appealing to viewers |
| 5. Learning about the Exposure Triangle | Allows you to control exposure correctly. |
| 6. Adjust Your On-Camera Flash | Remove unnecessary brightness from photos. |
| 7. Check White Balance | To capture photos with appropriate colors. |
| 8. Read the Histogram | Refrain from taking under- or overexposed photos. |
| 9. Keep Eyes in Focus | To snap eye-catching images. |
| 10. Think about the Background | To make photos clean and appealing. |
| 11. Opt for the Perfect Shooting Time | To shoot your best images. |
| 12. Use Aperture Priority and Shutter Priority Modes | Helps you shoot portraits or moving objects with ease. |
| 13. Increase the ISO | To get sharp images in low-light situations. |
| 14. Use Professional Image-Editing Software | To give your photos a professional look. |
| 15. Stay Motivated and Learn from Mistakes | Helps you continue your journey to becoming a pro photographer. |
15 Professional Photography Tips for Beginners (Complete Guide for 2026)
If you’ve ever looked at a photo someone else took and thought, “How did they make that look so good?”, you’re not alone. Most of us start with the belief that great photos require a high-end camera, expensive lenses, or a studio setup.
The truth is surprising: you can take stunning, professional-looking pictures with the gear you already own – even a basic entry-level camera or a smartphone.
Photography is a skill, not a shopping list. Once you understand how light works, where to position your subject, and how to control your camera instead of letting it control you, everything changes.
This guide will walk you through 15 practical tips every beginner should know in 2026 – the exact techniques professional photographers rely on every day.
1. Hole Camera Correctly

The most common mistake beginner photographers commit is to hold cameras inappropriately in shaky hands. As a result, they get blurry images after capturing photos due to the camera’s shakiness. Thus, learning to hold your camera correctly is quintessential.
Try to hold your camera with both hands as steady as possible. Precisely, grip the camera’s right side with your right hand and place your left hand underneath the lens to support your camera’s weight.
Finally, keep the camera close to your body to prevent shakiness. You can lean against a wall or crouch down on your knees for additional support and stability. Nonetheless, suppose you find the tips mentioned above a hassle.
In that case, you can invest in the best-quality camera tripod to eliminate the problem of holding your camera for a prolonged period with your bare hands and getting fuzzy pictures.
2. Shoot in RAW
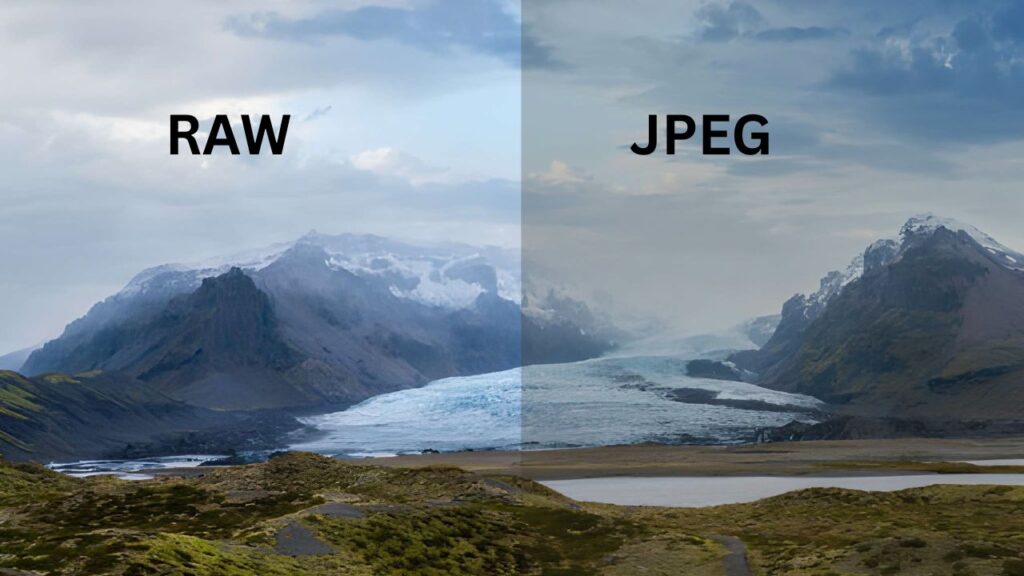
Often, newbies utilize the JPEG format. They do it as this format enables them to take a lot of images quickly and share them immediately without editing the pictures. Another benefit is that JPEG photos don’t occupy as large a space in their cameras’ SD cards as RAW images.
But we discourage you from shooting in JPEG. Instead, we encourage you to shoot in RAW as you are on the path to becoming a professional photographer. By using the RAW format, you won’t only get high-quality photos, but you will also have more control over post-processing images.
For instance, you can tweak underexposure, color temperature, and contrast and perform complex yet stunning image manipulations. Thus, opt for using this format when capturing images. Benefits of shooting in RAW:
- You’ll get more details and colors as well,
- Easily correct any mistakes by doing simple edits,
- The printout looks better.
3. Master the Rule of Thirds
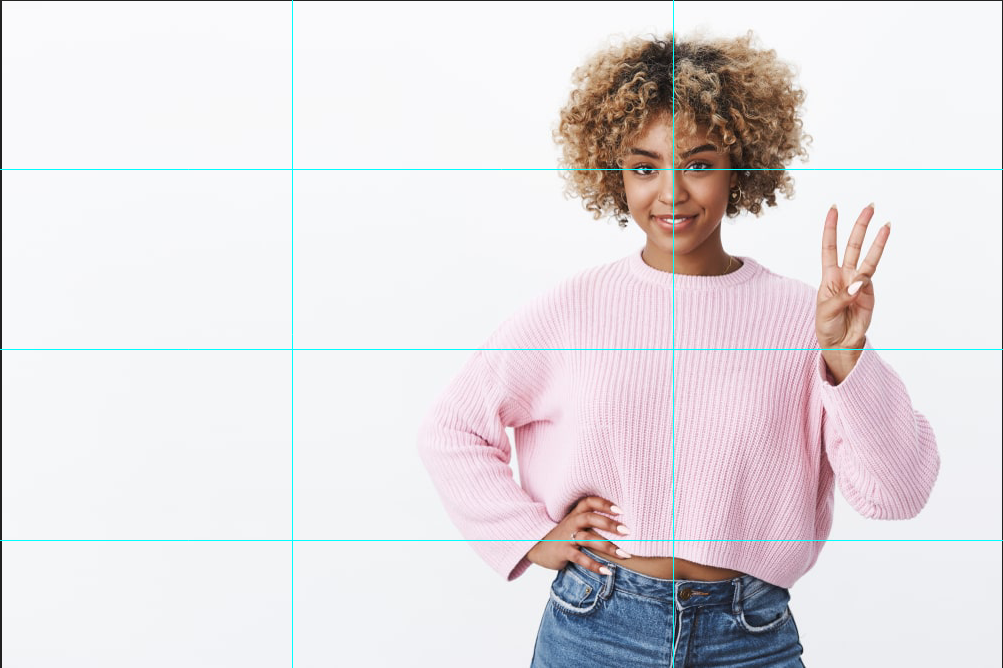
The main idea behind the Rule of Thirds is to place the most important elements of an image along these lines or at the intersections where the lines meet. This technique is believed to create more visually appealing and balanced compositions.
For example, when you’re taking a picture of a landscape, you might place the horizon along one of the horizontal lines, and key elements like the sun, a tree, or a person along the vertical lines or intersections. This creates a sense of balance and interest in the image.
The “Rule of Thirds” is a fundamental concept in visual arts, photography, and design. It’s a guideline that suggests dividing an image into nine equal parts by creating two equally spaced horizontal lines and two equally spaced vertical lines. This results in a grid with nine smaller rectangles or squares.
4. Try Different Shooting Angles

Trying different photo shooting angles is an effective technique to appear and shoot as a professional photographer. You know you can make the same photo look entirely different if you snap it from a different angle. You may capture the image from above or below to make the ordinary photo look extraordinary.
FYI, all shooting angles won’t work for all photographs. You need to experiment and try varied angles to match particular photos. Here’s a pro tip: If you want to frame objects half your length, try capturing them by getting down to their level so you can view the world through their eyes.
Another tip to capture a perfect portrait picture is to stand on a bench and shoot your main object from above. So, utilize different shooting angles to make your images stand out and attractive.
Changing your perspective can lead to interesting and unique photographs. Here are some ways to do it:
- Hold the camera above you: Use a tiltable screen to capture scenes from high angles, providing a different view of the subject.
- Utilize reflections: Look for reflective surfaces like lakes or puddles to create intriguing mirror-like images of landscapes or abstract shots.
- Get low to the ground: Position your camera facing up from a low angle to capture subjects like flowers or people from a different, more dramatic perspective.
- Sit down for a lower perspective: By sitting on the ground or a seat, you can photograph objects that appear taller and get more natural shots of children at their eye level.
- Try the ant’s eye view: Get down to ground level for macro shots of insects, plants, and other small items, using a small aperture for greater depth of field.
5. Learn about the Exposure Triangle
Exposure is a basic photography term that refers to the amount of light reaching your camera’s sensor and creating visual data over time. It has three essential elements: ISO, Aperture, and Shutter Speed. Let’s learn about them.
I. ISO
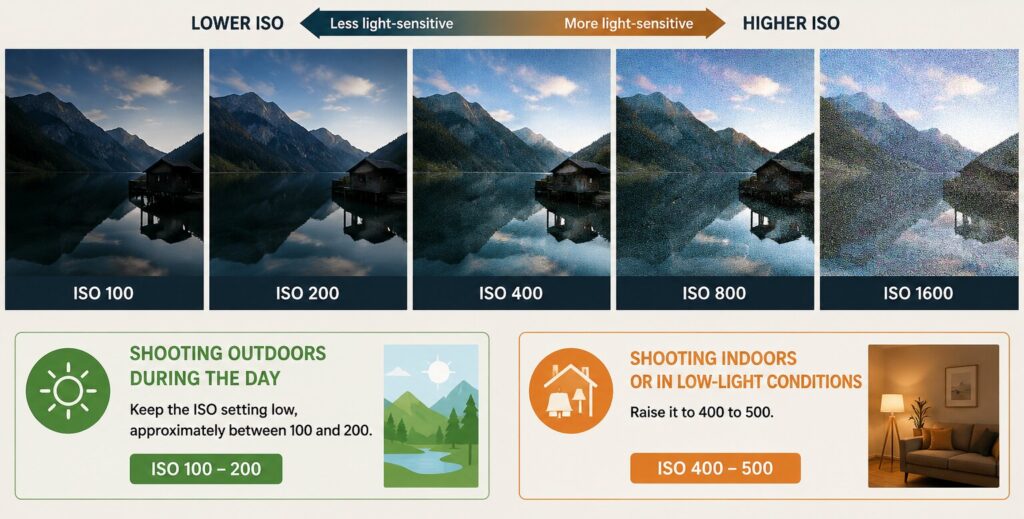
ISO administers the camera’s light sensitivity. If you set it low, your camera will be less light-sensitive. In contrast, when set to a high ISO, your camera will be highly sensitive to light. If you shoot outdoors during the day, keep the ISO setting low, approximately between 100 and 200. Raise it to 400 to 500 when shooting indoors or in low-light conditions.
II. Aperture
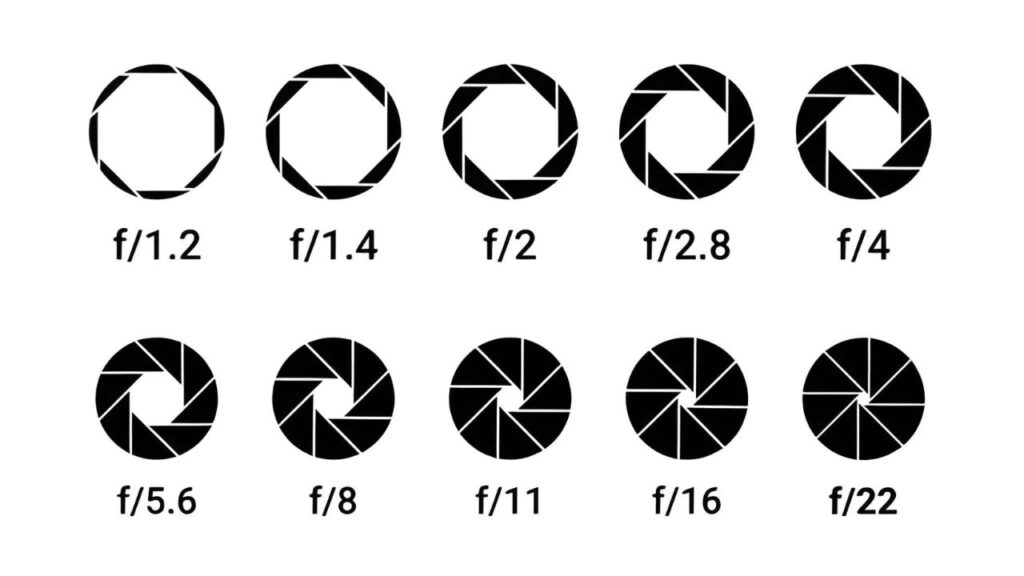
The aperture controls the light streaming through the camera’s sensor. If you use a wide aperture setting, your camera’s sensor will receive more light. The opposite incident will take place when you use a narrow aperture.
Generally, photographers go with the wide aperture while isolating a subject within a frame. They choose a narrow aperture to keep the whole scene in focus, such as in group photos.
III. Shutter Speed
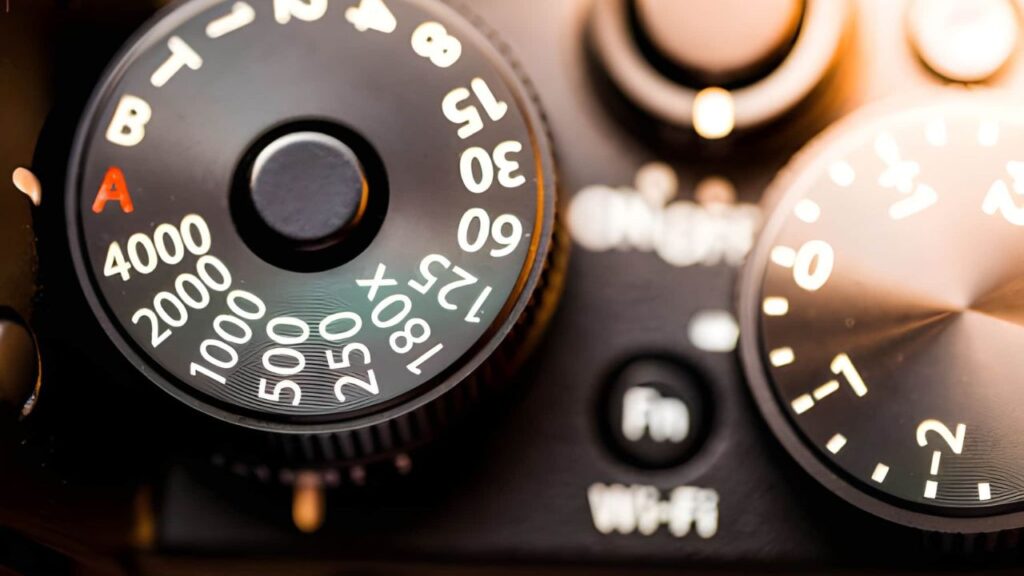
Shutter speed controls how long your camera shutter remains open while capturing an image. Like the ISO, it also controls the amount getting through your camera’s sensor. If your camera’s shutter stays open for a long period, it will allow more light to stream through to the sensor.
IV. Focal Length
The focal length of a lens determines its field of view or angle of view. A shorter focal length, such as a wide-angle lens, has a broader field of view, while a longer focal length, like a telephoto lens, has a narrower field of view.
When using a lens with a larger aperture (smaller f-number, e.g., f/2.8), more light can pass through the lens, leading to a brighter exposure. Conversely, a smaller aperture (larger f-number, e.g., f/16) allows less light to pass through, resulting in a darker exposure.
6. Adjust Your On-Camera Flash
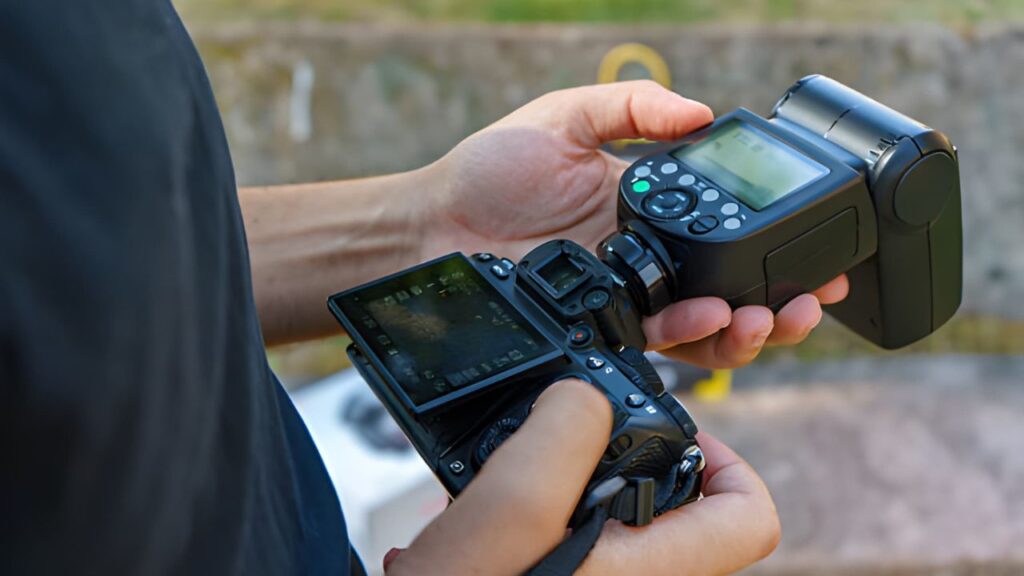
Another amazing trick on this list of 15 beginner tips to take professional photography is to play with your built-in camera flash. We recommend reducing the on-camera flash’s brightness by using the flash settings to eliminate clicking photos with unpleasant effects, such as harsh shadows, red eyes, etc.
You can also opt for diffusing the flash by placing something over it, like a piece of paper or scotch tape. This will help you eradicate the problem of getting unnecessary lights in high-light conditions and click perfect images.
Adjusting the on-camera flash can significantly impact photo quality in challenging lighting conditions. Here are some tips:
- Flash Power: Control flash intensity with flash exposure compensation (FEC) to adjust light strength (+/- values).
- Bounce Flash: Tilt the flash head to bounce light off surfaces for softer, natural illumination.
- Flash Diffusers: Attach diffusers or softboxes to soften the light and avoid harsh shadows.
- Slow Sync Flash: Use slow sync mode in low light or motion shots for balanced exposure.
- Fill Flash: Use flash as fill light outdoors to reduce shadows (lower flash power).
- White Balance: Match flash color temperature with ambient light for consistent tones.
- Distance: Adjust flash-to-subject distance for varying light strength and shadows.
7. Master Adjusting White Balance

White balance helps you capture colors more appropriately. FYI, different light types have varied characteristics. Thus, you may capture colors like blue, orange, or green hue if you don’t adjust the white balance.
Try different white balance settings such as Automatic White Balance, Daylight, Cloudy, Flash, Shade, Fluorescent, and Tungsten to eliminate unnecessary photo colors.
Adjusting the white balance on a DSLR camera controls the color temperature for accurate and natural colors in different lighting. Steps include
- accessing the White Balance menu,
- choosing from presets like Auto, Daylight, etc., and using the camera’s control buttons.
- Set a Custom White Balance by measuring a neutral surface (if needed).
- Evaluate results on the LCD screen and readjust (if needed).
8. Read the Histogram
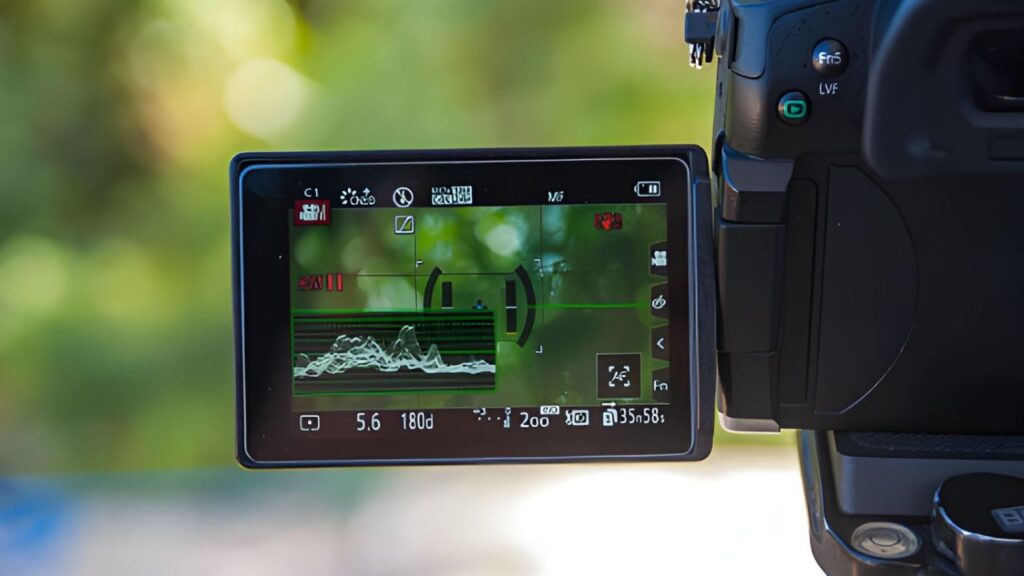
Reading the histogram is one of the excellent photography tips for better results. Professional photographers follow this technique to determine whether their images are overexposed or underexposed. Here’s how they do it.
They look at the histogram that remains next to the images. They understand the images may be overexposed after finding the histogram’s left side gets skewed. On the contrary, they think the images may be underexposed when the histogram’s right side is crooked. You can follow this method to determine your images’ exposure conditions.
9. Keep Eyes in Focus

When shooting portrait images of people or animals, you need to keep their eyes in focus. To get both eyes of your subject in focus, first aim at one eye while keeping the shutter button pressed down halfway and move the camera slightly to recompose the scene, and include the second eye once you focus the first eye.
You must follow this method while taking close-ups or headshots. It will take a little practice to master this method, but you will be amazed by the results after utilizing this technique.
10. Think about the Background

Amateurs often don’t pay enough attention to the background while clicking images, so their photos don’t look stunning. But you won’t do it. Instead, you will try to keep the background simple and clutter-free in order not to distract your viewer’s attention from the main subject of your images.
You can change shooting angles and move subjects to fix the background. Also, you can use a wide aperture to obscure the background. The point here is to keep the background simple and neutral.
11. Opt for the Perfect Shooting Time
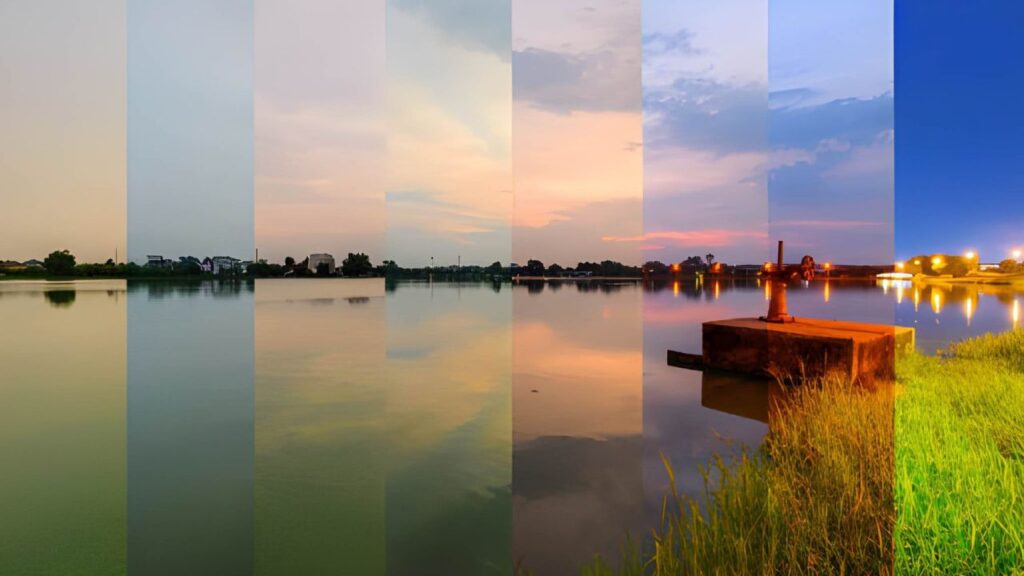
When you shoot plays a vital role in how your photos will look after capturing them. In photography, the golden hours are the early morning and early evening. Hence, try to capture eye-soothing photos during these periods. Choose early morning to shoot landscapes, still life, or portraits, and use early evening to give your images a serene feel.
12. Use Aperture Priority and Shutter Priority Modes
Aperture and shutter priority modes allow you to tweak the aperture and shutter time automatically. Photographers use these modes when they feel less confident using manual aperture and shutter settings.
You can use these modes if your camera comes with these settings. Before using them, it will be wise to learn about how they work. Here you go: Aperture Priority Mode lets you set your preferred aperture without adjusting the shutter setting, since your camera will automatically set it.
For example, when shooting portrait images, you choose the best-suited aperture considering the environment, and your camera will choose the shutter speed for you. In contrast, Shutter Priority Mode will let you select the shutter speed and forget the aperture setting, as your camera will do it for you and help you get a clear shot of moving objects.
13. Increase the ISO
Increasing the ISO is a secret method in mastering beginner photography that many photographers try to avoid, thinking they will get grainy-looking photos. While it’s true to a certain extent that raising the ISO can damage the image quality, we encourage you to perform it at the right moment.
For example, suppose you are in a situation where you can’t lower your shutter speed and have no tripod. In this case, you need to raise the ISO and get a sharp photo with a bit of noise that you can remove in post-processing. Or else, you can use a wider aperture with a higher ISO to reduce image noise.
When using zoom lenses, you might need to adjust the ISO setting to compensate for the reduced light-gathering capability at longer focal lengths, especially if you cannot open up the aperture or use slower shutter speeds. Finding the right balance between aperture, shutter speed, and ISO is essential to achieving the desired exposure while maintaining good image quality.
14. Use Professional Image-Editing Software
As you know, professional photographers shoot in RAW and fine-tune images in post-processing. You should prioritize the post-processing option and invest in fantastic image-editing software. You can use applications like Adobe Photoshop or Lightroom, Picasa, Paint Shop Pro, etc.
We recommend using a couple of photo-editing software to generate the best output. Also, put effort into learning in-depth about photo editing techniques using these applications, alongside improving photography skills.
15. Stay Motivated and Learn from Mistakes
You will make mistakes as a beginner and will get frustrated. But you shouldn’t lose hope of becoming a pro in photography. Instead, stay positive and learn from your mistakes. Every time you get a bad image, do not delete it. Rather, spend time figuring out what went wrong and how you could improve it.
Conclusion
These are all about 15 beginner tips to take professional photography and make every click remarkable. Even if you are a beginner photographer, you can amuse your viewers with photos if you follow the rules mentioned above.
However, these methods aren’t sufficient to make you a professional photographer. You need to learn about varied photography techniques constantly, and you will reach your end goal with time.
Our best wishes are with you on your journey to becoming a professional photographer. Not only is it an important professional photo editing service, but it is also important. For any kind of professional photo editing service, give us a free trial to show our skills.
Frequently Asked Questions (FAQs)
What Are the Basic Tips in Photography?
Pick the best quality camera and additional equipment. Utilize the rule of thirds while taking photos. Try different shooting angles to get better results. Figure out ideal lighting, ISO, aperture, and shutter settings. Pay attention to framing and background, and take many shots before finalizing one.
How to Become a Professional in Portrait Photography?
To become a professional portrait photographer, focus on technical skills, artistic vision, and business acumen. Master your camera and gear, study composition and posing, and develop editing skills. Build a diverse portfolio, gain experience, and attend workshops. Collaborate, create a professional online presence, and set competitive pricing. Seek feedback, continuously improve, and market yourself to find opportunities. Success in portrait photography requires dedication, persistence, and a commitment to learning and growing as an artist.
What Are the 5 Steps to Great Photography?
Here are the 5 steps to great photography: Find the light. Inspect your image background. Expose appropriately. Capture remarkable moments. Print your photos.
What Are the 7 C’s of Photography?
The 7 C’s of photography are composition, contrast, candid, cropping, clarity, color, and cutline. These are essential to understand if you capture images for publication.
What Are the 3 Most Essential Things in Photography?
The three most essential things in photography are light, subject, and composition. If you master these three things, you can easily and effectively deliver any message with your shots.