
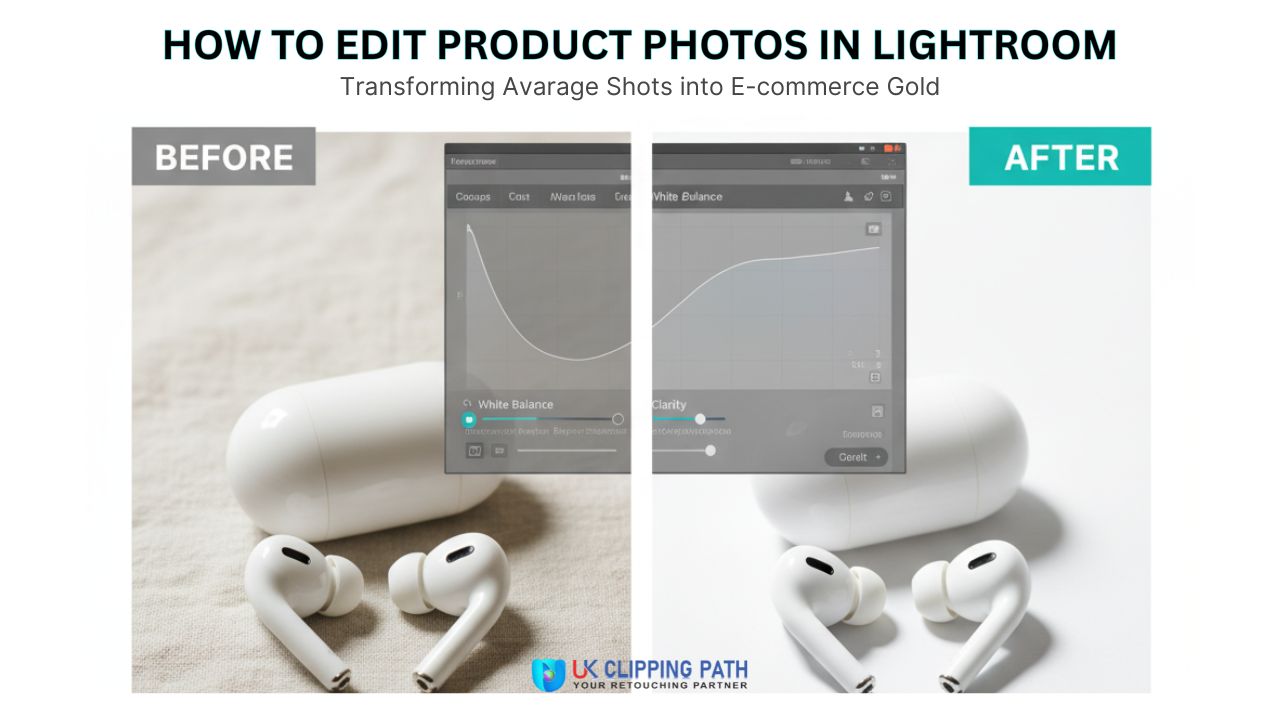
Do your product images look a little bare? Inconsistent images or unprofessional visuals can negatively impact your sales. Customers want to see bright, clear, and beautiful images before making a decision to buy.
This is where Adobe Lightroom will come in. It’s the best tool for transforming, enhancing your product images to look amazing and consistent. With a few clicks, you can change an average image into an incredible image.
In this blog, we will take you through editing product images in Lightroom from the initial setup right through to exporting images to an expert standard. You’ll be producing crisp, rich, and beautiful product images in no time, and help to increase your sales.
The Foundation: Importing and Organizing Your Product Shots
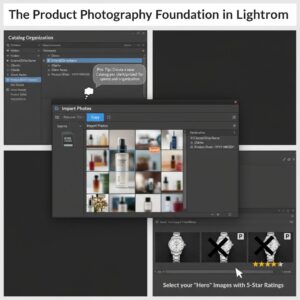
The first step is to organize. This part makes things a lot easier along the way.
Organizing Your Lightroom Catalog for E-commerce
First, let’s define what a Lightroom catalog is. A catalog is a large ‘library’ for your photos. It doesn’t store your actual photo files, but it records where the photo files are located and all your edits to those files.
Here’s a tip from the pros: Create a new catalog each time you begin working with a client or start a big project to keep everything organized and to help your computer run faster. You won’t need to go through thousands of photos to locate what you need to use or edit.
Importing your RAW files
After you take photos, your camera will either save your images as JPEG files or RAW files. Always pick RAW. A RAW file retains all the data from the camera sensor, providing increased freedom while editing the image.
A JPEG file takes up less space because the camera already made some decisions. The RAW file allows you to have control over how to edit the file. To import your photos, open Lightroom and select the “Import” button. It will open a new window for you to choose photos and select the option to “Copy” the photos to a new location.
Culling and Rating: Finding Your “Hero” Images
You very likely took multiple photos of each product, and now you have to determine which ones are the best. This is the process of culling, and Lightroom provides an excellent rating system to support this decision!
You have the option to specify a star rating for your photos from one to five. This will allow you to easily see which images will be worthwhile to edit!
With our best images selected and organized, it is time to move into Lightroom’s powerhouse: the Develop Module. This is where the magic happens.
The Core Workflow: Essential Edits in the Develop Module
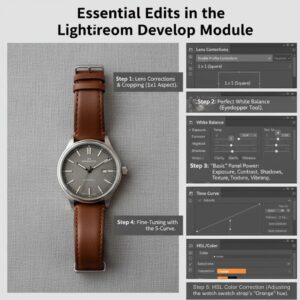
The Develop Module is where you will spend most of your time. On the right side, you will see a bunch of panels with sliders. Don’t worry, they are easier to use than they look.
Step 1: Lens Corrections and Cropping
Before you do anything else, scroll down to the “Lens Corrections” panel. Check the box that says “Enable Profile Corrections.”
Use the Crop tool to make your product the star of the show. If you sell on a site like Shopify or Amazon, you might need a square photo. You can set the aspect ratio to 1×1 to get a perfect square every time.
Step 2: Achieving Perfect White Balance
Have you ever taken a photo that looks too blue or too yellow? That is a white balance problem. Accurate colors are super important for product photos. You want your customers to see the true color of what they are buying.
The easiest way to fix this is with the White Balance Selector, which looks like an eyedropper. Just click it on something in your photo that should be neutral white or grey. Lightroom will instantly adjust the colors for you. You can also use the Temp and Tint sliders for manual adjustments.
Step 3: Fully Understanding the “Basic” Panel
The Basic panel represents your largest changes made in the editing process. Let’s go through the most impactful sliders.
- Exposure & Contrast: Exposure determines the brightness or darkness of your photo. Contrast adds pop by making the brights brighter and the darks darker. These two combined are the backbone of a nice photo.
- Highlights, Shadows, Whites, Blacks: These sliders give you more control. Bring the Highlights slider down to bring back details in the bright areas of the photo. Bring up the Shadows slider to see more details in the dark areas. The Whites and Blacks sliders adjust where the true white point and the true black point are for your photo.
- Texture, Clarity, Dehaze: These sliders will help add sharpness and detail. Texture is a good choice to enhance the details in things like fabric or wood. Clarity will create mid-tone contrast, which helps the image pop. Just be careful not to overuse clarity, especially on any shiny products.
- Vibrance & Saturation: These sliders will both enhance the intensity of colors. Saturation increases all of the colors in the photo equally, which can create a very unnatural look sometimes. Where vibrance is smarter, it will primarily increase less saturated colors, which is usually very nice for product photos.
Step 4: Fine-Tuning with the Tone Curve
The Tone Curve is yet another feature used to edit brightness and contrast, and it appears similar to a graph. It is possible to subjectively add contrast by creating a simple “S-curve”. You can do this by simply clicking on the line in the middle and adding two points. Pull the top up a little, and the bottom down a little, and you have a nice subtle contrast boost.
Step 5: Advanced Color Correction with HSL/Color
Sometimes, there is only one color that is incorrect in the photo. The HSL/Color panel is used for these moments. It allows you to change an individual color. If a blue shirt looks a tad purple, you can just select the blue channel and adjust the Hue. This is an important step for learning how to edit product photos in Lightroom.
If it’s a product and completely off, or you need precise accuracy in your colors, you can always use a professional color correction to help ensure brand consistency.
Advanced Techniques for a Polished, Professional Look

The smallest details can make the largest impact. Using these final touches can elevate your image.
Sharpening and Noise Reduction
You will want your product images to appear sharp and crisp. In the “Detail” panel, you can add sharpening to your image. A great trick is to use the “Masking” slider. The parts that are black will not be sharpened. This allows you to sharpen just the edge of your product, and not the smooth background.
If your photo is grainy, that is called noise. That usually happens when you shoot in low light. The Noise Reduction slider will smooth those areas.
Spot Removal and Retouching
Is there a minute piece of dust on your product? Or a slight scratch in the backdrop? The Spot Removal tool can help with that. It’s essentially a magic eraser; simply click on the spot you want to remove, and Lightroom will perform the magic for you.
When you have more complicated jobs, such as removing a logo or deep-etching products, you often need more specialized things.
Local Adjustments with Masking (Brushes, Filters)
Sometimes you only want to edit a portion of your image. That’s what the Masking tools are for. You could use an Adjustment Brush to “paint” on an effect like extra brightness, specifically to an area of your photo. Or, you can use a Radial Gradient to draw a circle and brighten or darken everything inside or outside of the circle. This is a useful tool to make your product pop.
Creating Consistency and Speed with Batch Editing
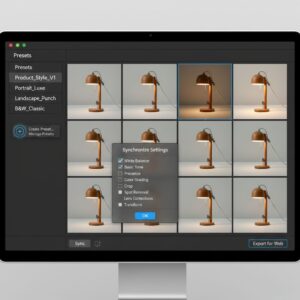
When you have many photos and you have to make each edit one by one, it could seem like forever. This is a major benefit of batch editing. It requires less time.
Create Your Own Editing Presets
After you have edited a photo to your liking, you can save the edit values as a preset. A preset is like a recipe for your photo style, simply one click!
In the Develop module, go to your Presets panel, click the plus icon in the panel, and click Create Preset. Name the preset, and now you can click that preset to apply that look to any other photo with one click. This is how you achieve a consistent look on all your product photos.
The “Sync” Feature: Your Best Friend for Batch Processing
The “Sync” or “Synchronize” feature is another amazing tool for batch processing. First, edit one image perfectly. Then, select that image and all the other images from the same photoshoot that need the same edits. Click the “Sync” button.
A window will pop up asking which settings you want to copy over. You will probably want to sync things like White Balance and your Basic panel settings. You should avoid syncing things like Spot Removal or Cropping, as those are usually different for each photo.
Your images are now perfectly edited and consistent. The final step is to export them with the correct settings for the web. This will make sure they look great and load quickly for your customers.
Exporting Your Photos for E-commerce Platforms
You have done all the hard work. Now it is time to save your photos so you can use them on your website. This is called exporting.
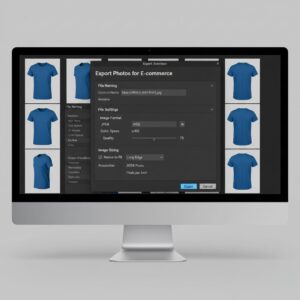
Getting Familiar with the Export Settings
When you click the Export button in Lightroom, you’ll see a new window with a whole lotta options.
- File Naming: You want to give your file a name that has SEO benefits. Instead of “IMG_1234.jpg,” try naming it something like “blue-cotton-t-shirt.jpg.”
- File Settings: For web usage, you should always use JPEG as a file format. Also, always choose sRGB as a color space. Lastly, set the quality to about 70-85, as it helps to keep the file sizes low. This will ultimately allow your website to load faster.
- Image Sizing: Make sure that your images are saved to specific dimensions for your website. A common dimension is 2048 pixels on the longest edge. Also, verify the resolution is 72 pixels/inch, as that is the common profile for screens.
When You Need a Transparent Background
Sometimes, you need your product to be on a perfectly transparent background. This is useful for catalogs or for placing your product on different colored backgrounds. Lightroom cannot do this. It can only export photos with a background, like white or grey.
This is where Lightroom ends and Photoshop begins. For a transparent background, a professional clipping path service is essential. They carefully trace your product to create a clean PNG file that is ready for any marketplace.
Bringing Your Product Photographs to a New Standard
We have covered a lot today. You have learned how to import and organize your photos, carry out some basic edits in the Develop module, and use some more advanced tools to render your images a professional look. You now understand the workflow for editing in batch mode for efficiency, as well as exporting photos for online use.
High-quality images invoke trust in your customers and can really help increase your sales. Learning how to edit product images in Lightroom is a skill you can carry with you. It gives you the power to manage your brand image completely.
Although incorporating some of these methods will significantly improve your images, our team of expert editors at UK Clipping Path can help you take your images to pixel-perfection, whether it be one photo or in high volumes. We can assist. Contact us today for a complimentary quote!
FAQs
- How do I get accurate product colors?
You will use the White Balance Selector, which looks like an eyedropper. Click on a part of your photo that is neutral, white, or grey. This will fix all the colors in the image instantly! - How do I brighten my product photos?
Use the “Exposure” slider in the Basic panel. Slide it to the right to brighten the entire photo. Just don’t brighten too much, so you lose details in the bright areas of the photo. - How do I make my products “pop” more?
Slide the “Contrast” slider slightly higher. This makes the bright parts brighter and the darker parts of the photo darker, both adding a nice element. The “Clarity” and “Texture” sliders can also help with a more detailed photo. - What is the best way to crop e-commerce photos?
Use the Crop tool to crop your products to a 1×1 aspect ratio, which is perfect for a square. Most platforms like Shopify and Instagram prefer square images. This will keep your product in the middle of the frame while looking professional. - Can I eliminate dust or small spots in Lightroom?
Yes, use the Spot Removal tool. It is like a magic eraser. Just click on the speck of dirt or spot you wish to eliminate, and Lightroom will eliminate it for you. - How do I sharpen my product photos correctly?
In the “Detail” panel, make the sharpening greater. Next, use the “Masking” slider while keeping the Alt (or Option) key pressed down. This will enable you to sharpen the product edges by themselves and not the smooth background. - What is a Lightroom Catalog?
A catalog is like a database of your pictures. It doesn’t store the pictures themselves, but it knows where they are kept and records every single edit you make to them. - Do I use Lightroom Classic or Lightroom CC?
Use Lightroom Classic when you are saving pictures on your computer’s hard drive and want the most powerful tools. Use Lightroom CC if you want to save photos in the cloud and switch between multiple devices.