The most common method of clothing photography is the use of a ghost mannequin. You may find it difficult to demonstrate the shape and fit of your clothes without a ghost mannequin. This is the most efficient and cost-effective method, rather than hiring models. Using ghost mannequins will make your clothing images look more professional and consistent.
Typically, ghost mannequin clothing photography entails taking multiple shots of a mannequin or model and combining them in post-production processing to remove the mannequin or model, allowing the product photos to take on their true shape and fit.
The entire process of photographing ghost mannequins and post-production processing takes a significant amount of time and effort. Read this helpful article before enlisting a post-production company.
We’ll go over everything you need to know about creating a DIY Ghost Mannequin Effect for clothing photography at home.
What Is the Ghost Mannequin Effect
Ghost Mannequin Effect, also known as Invisible Mannequin Photography or Hollow Man Photography, is a photographic and post-processing technique commonly used in the fashion industry to showcase clothing in a way that gives the illusion of a three-dimensional shape without the presence of a model or visible mannequin.
To demonstrate better fit, use ghost mannequin effects to create a 3D shape in your clothing images. Ghost mannequin photography and post-production processing are the most well-known techniques that occur. An invisible ghost mannequin is another name for it. The goal of this method is to help people understand your clothes better and to attract more customers.
How Ghost Mannequin Effects Improve Your Clothing Photos

Ghost mannequin photography can help you improve your garment photography in a variety of ways. The main benefits of ghost mannequin effects are adding professionalism, boosting product presentation, producing greater detail, and increasing consistency, and clarity. Furthermore, it enables you to improve your whole apparel image and increase sales. To know more about how the ghost mannequin effect can improve your clothing images and boost your sales, read the detailed article here.
One of the main advantages of using ghost mannequin effects is that it allows the focus to be solely on the clothing item itself. By removing the distractions of the mannequin or model, potential customers can get a clear and unobstructed view of the garment, including its shape, fit, and design details.
Hiring models for every clothing item can be expensive and time-consuming, especially for small businesses or startups. With ghost mannequin effects, you can simply photograph the garments on a mannequin and then edit out the mannequin later. This not only saves money but also allows for a faster and more efficient photoshoot process.
How to Create DIY Ghost Mannequin Effect at Home for Clothing Photography

It’s not as simple as it appears to make ghost mannequin effects on your outfit. There are a variety of ways and ideas to help you acquire the photographs you want. I’ll walk you through every stage of creating ghost mannequin effects on your clothes photographs at home. Here is a detailed guide on how to easily avoid common mistakes for ghost mannequin photography.
Required Equipment for ghost mannequin clothing photography
Ghost Mannequin
Instead of hiring a model to produce ghost mannequin effects, you should purchase any mannequin that meets your demands. Make sure the mannequins have removable chests and arms when you acquire them so you may create undetectable shots by removing individual sections.
Camera
Any camera can be used to picture ghost mannequin apparel. However, as a general rule, the higher the resolution of your camera, the more information your apparel photograph may produce and attract clients. We don’t advocate using your phone camera in this situation.
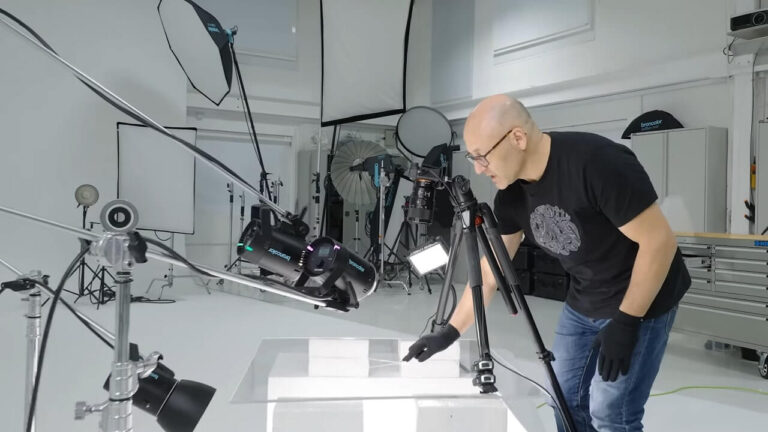
Studio Lighting
One of the most significant aspects of ghost mannequin photography is the use of light. To ensure that the light shines exactly where you want it to, we recommend selecting a solid light with a focusable bulb head. To achieve constant exposure, shadows, and contrast, set up optimum lighting.
Prepare Your Clothing
Prepare your attire before you start shooting. Check to see if they’re clean and fresh. Shirts, jackets, coats, blazers, and dresses are ideal clothing for photographing with a ghost mannequin.
Styling Tools
Clothes are tightened with clips, pins, tape, tissue paper, and other materials.
Step By Step Guide for Ghost Mannequin Clothing Photography

Image source: stylehub.com
Set Up The Camera
Any camera can take high-quality clothing photographs with the appropriate settings and positioning. When photographing clothing, keep the ISO as low as possible. When capturing product photographs, make sure to use the widest aperture feasible (F16 or F22).
Choose the Right Mannequin
They’re quite adaptable, with a large choice of sizes and styles to choose from. Make sure you have a range of mannequins on hand and choose the perfect one for the purpose. You won’t have to worry about your clothes budget because they’re cheap to buy and easy to find.
Dress Your Mannequins
When it comes to outfitting the mannequin, make sure the clothes are suitable. You can tweak the shoulders and make sure the seams are properly aligned. Take your time to inspect the fabric for any signs of stretching. As if it were being worn by an invisible person, the lining is now entirely exposed.
Style Your Clothes
If your garment isn’t quite right, use styling pins to tighten the back panel. You may use as many pins as you desire. Take your time styling the item on the model and making sure it fits correctly. If the garment has any creases, you won’t be able to take the perfect photo. As a result, make sure there aren’t any creases showing.
Take Shots
Everything is in working order. Now is the time to take pictures of your clothes. Focus on your lens and take multiple photographs to capture the complete item. You already know what your clients want, so get creative.
Post-Production Processing For Ghost Mannequin Photography
After you’ve finished shooting your ghost mannequins, you’ll need to fine-tune your images in post-production so that you can use them for whatever you want. You can either edit your own photos or hire a ghost mannequin service.
On the other hand, outsourcing this time-consuming task may save you time and effort. Follow these seven simple steps to create your own ghost mannequin effect in Photoshop if you have to make the edits yourself due to budget constraints.
1. Open your files in Photoshop and create layers
To edit the mannequin and foam board images, you’ll need to open them in Photoshop. For your mannequin image, create a new background layer. To make your overall background, fill that layer with white. Labeling your layers will help you distinguish them and keep track of them.
2. Select the product in the mannequin image with a Selection Tool.
To find the product in your mannequin image, click on it. Choose a selection tool to use: it could be anything from a selection tool to a lasso tool to a magic wand tool; all three can help you make the choice you want.
Due to the color separation between the product and the background, shooting with a white background allows you to easily remove the mannequin.
3. Adjust your mask’s position and fine-tune it
Refine your mask so that it is nice and tight after selecting the entire product and removing all of the background and mannequin. Selecting the “Refine Edge” tool from the select menu will also complete the task.
Place a mask on your shirt layer in the “Refine Edge” dialogue box and click “OK.”
Your product should now float freely on the white background you previously created.
4. With the Foam Board Image, repeat the previous steps
The mannequin illusion is completed by photographing the product inside-out and showing the product’s inside back.
Make a new layer, then choose the product before making and refining your mask.
5. Arrange the photos together
Drag the mask from your foam board image over to the image of your ghost mannequin product image once both images have tight, clean masks.
Place the foam board image on the bottom and the mannequin image on the top of the layers.
Adjust the positioning and proportions of the foam board layer so that it sits perfectly behind the mannequin layer in a rounded curve just below the shoulder.
6. Trim away any excess Foam Board Layer material.
Brush out any parts of the foam board layer that aren’t needed at this time and hide your mannequin layer.
Keep your neckline triangle between your shoulders at all times.
Because it’s already in place in the mannequin shot, it’s critical to remember to remove that piece from the foam board image.
Double-check that your layers are clean and that nothing is out of alignment after you’ve finished, especially around the neck and shoulders.
7. Save after you’ve finished adding shadows
To make the product images look more professional, add shadows between the two layers. Make sure you save your Photoshop file with all of the layers intact.
If the editing job is done correctly, you’ll get a fantastic 3D effect, which will improve your product photography and help you increase sales in your online store.
After you’ve finished shooting your ghost mannequins, you’ll need to fine-tune your photographs in post-production so that you may use them for whatever you want. You can either alter your own photos if you have a few volumes or hire a ghost mannequin service to save your time, effort, and money. We offer a high-quality 3D ghost mannequin image editing service at an affordable price while keeping your requirements and delivering within 1-24 hours. To get started, you can take our free trial for the first 02 images to match our service quality.
Final Words
If you own a fashion business, a ghost mannequin is a great way to keep your clothing images constant. It can save you time and money, whereas hiring a model and putting together a high-end setup may be more expensive. Focusing on the strategies outlined above will go a long way in helping you produce ghost mannequin effects on your clothes photographs at home.